


Okay, we have all the measurements from the last post... let's get drafting.
For reference, here are my actual measurements so you can see how they are used as I am drafting:
A=28"EDITED TO ADD: My mum is much smaller and a lot less curvy than me and this suit as drafted fits her too. So don't get too worried about the exact measurements, bathing suit fabric with its four-way stretchiness will compensate for a lot of the differences between you and me!
B=28"
C= 31"
D=34"
E= 4"
F=4.5"
G= 3.5"
H= 5"
I= 11"
Get a giant piece of paper (at least a foot wide and two and a half feet long) . Mark a point at the left edge of the paper near the top of the paper. Draw a perpendicular line across as a starting point. Mark along this line your quarter rib cage measurement (A/4). Vertically, measure down the distance between rib cage and true waist ( E). Draw another perpendicular line here and mark a quarter of your true waist. (B/4). Vertically, measure down the distance between true waist and low waist ( F). Draw another perpendicular line here and mark a quarter of your low waist (C/4). Vertically, measure down the distance between low waist and high hip ( G). Draw another perpendicular line here and mark a quarter of your high hip (D/4). Connect these points and then gently curve them if required so the lines aren't angular.

After you have drafted that, you need to draft the front portion of you bathing suit bottoms. I'm going to go a little unscientific here, I cut up a pair of my boy-cut briefs to trace out for this bit. I don't think people will vary too much and the four-way stretch of the fabric will compensate for differences in-and-of-itself, however, if you're much bigger than me you might need to increase the width of the bottom line from 2.5" to something greater. Remember, though, we are drafting in quarters so an increase by half an inch to this line will yield a total of two inches overall.
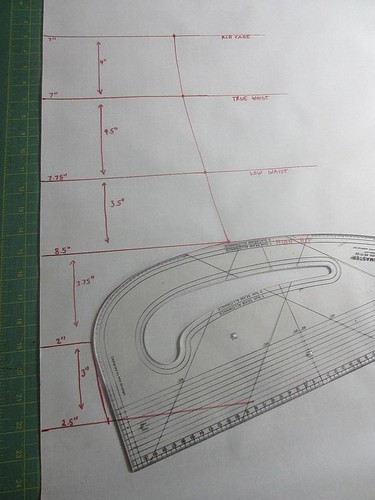
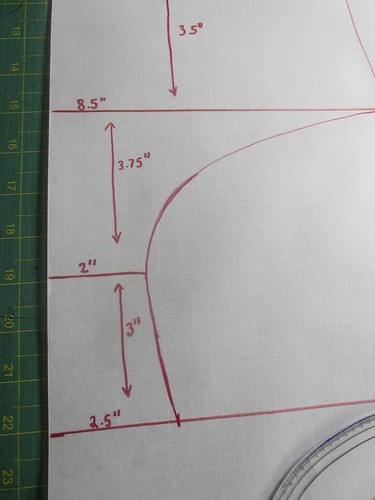
Okay, measure down 3.75" from the perpendicular high hip line and make another perpendicular line. Mark 2" along this line. Measure down 3" from this perpendicular line and make another perpendicular line. Mark 2.5" along this line. Use your curve (if you have one!) to give curvy-ness to connect these points. If you don't have a curve, just free-hand it (see above). The higher you place your curve, the more high cut the leg hole will be. However, this suit is based on a low cut leg, if you want a higher cut leg you will want to move it above the high hip line and the side seam will stop somewhere between your high hip and low waist.
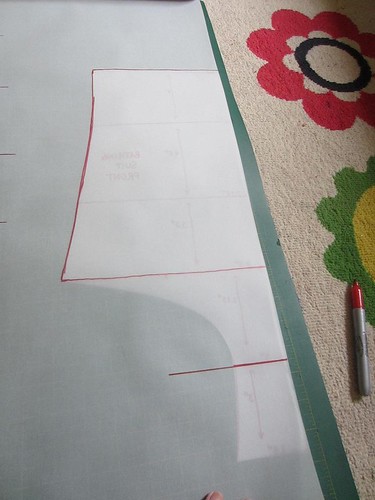
Trace your front piece onto another piece of paper so we can draft the back. I used semi-sheer paper so I could see the front piece at the same time. If you are very ample of bum (I am not!), you might want to increase the width at the high hip point by an inch or two and then re-draw your curve. This will mean that you have more space in the back of your suit than you do in the front, more bum coverage, and a bit more extra room in the leg openings.
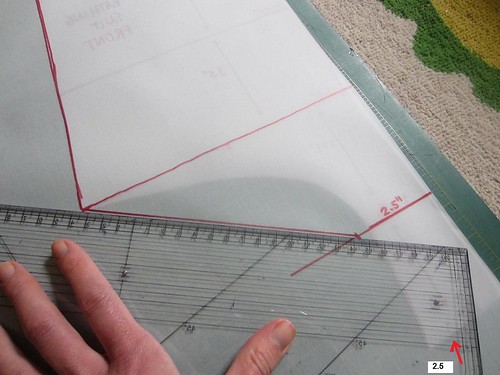
On the first line below your high hip line, mark 2.5" along from the edge to match the width of the lowest part of the front piece (these will be seamed together). I made a little arrow in the picture below to show you what it matches with. Connect this point with the high hip point.
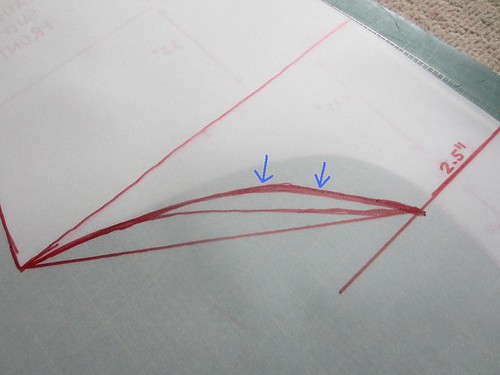
Now you need to decide the curve for your back of your bathing suit bottoms. Just like the front, the higher the curve the higher cut they will be. For my first two suits I used a slightly curved version of the diagonal line above, however, I wondered if perhaps it was slightly too low cut so I introduced a curve (which may or may not be too high cut!), shown by the blue arrows:
For the front ruched section you'll need to trace and slide the front piece you already drafted. Make sure you have a big enough piece of paper! First, trace the top box from the first step:
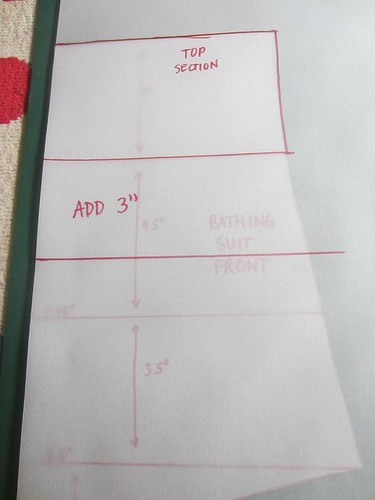
Then, perpendicularly draw a line three inches below this box. Slide down the front piece so it ends on this new line. Then trace the middle section.
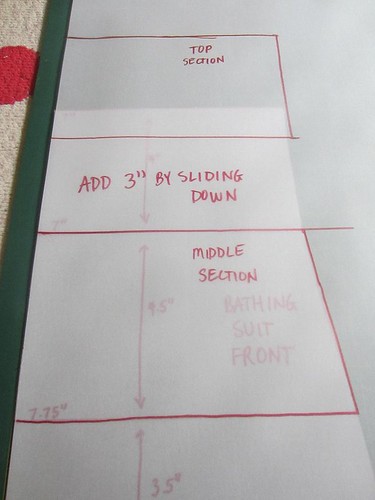
Repeat this process to add another 3" between the sections. Trace and slide!
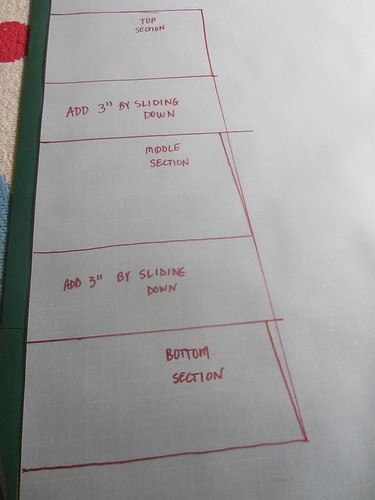
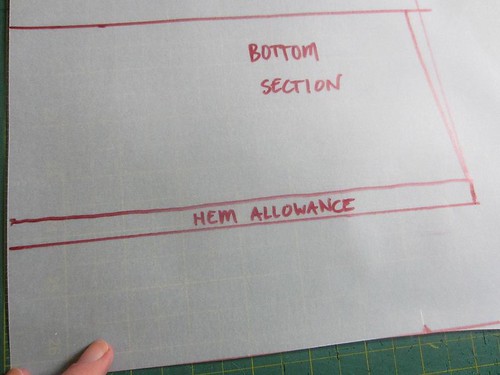
True up the sides so it has a nice curve. Then add half an inch hem allowance at the bottom.
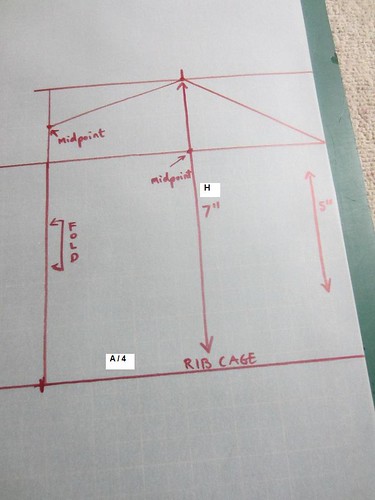
Now for the bodice. Perpendicularly, you need to use the same A/4 (rib cage divided by four) for your base line. Draw this line. Vertically draw up five inches at the side of the paper (this is for busty me trying to completely hide my bra, if you are significantly smaller you can go a bit shorter). This is your side seam. Draw horizontally across and then down so you have a rectangle that is A/4 by 5" by A/4 by 5". At the top of the rectangle, find the mid-point horizontally and mark this point. Measure up so that the vertical measurement is the same as H (so that's 7" for me). Connect this point to the side seam where the top or 5" ends. At the 'Fold' side of your rectangle, find the mid point between the height of the side seam and the height at the apex (so for me that's 6"). Connect this line too so it slightly Vs at centre front.
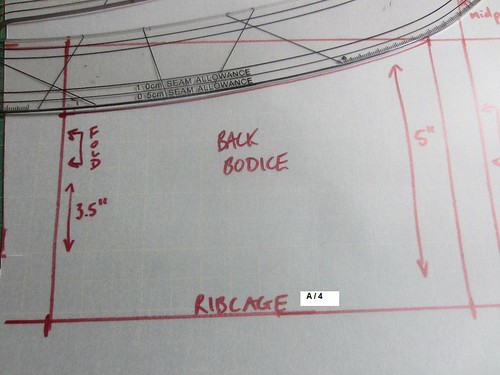
For the back bodice, you need to do the same drill... The side seam needs to be the same five inches as you drafted in the last stage and the width needs to be the same A / 4 measurement. If you want, use your curve to made the back piece (as I did) curved down to 3.5" at the fold... or if you prefer, you can leave it right straight across.
Now you're done with all the tricky bits: you have a front piece, a ruched front piece, a back piece, a front bodice piece and a back bodice piece. The remaining pieces are rectangles.
For the shoulder straps, make a rectangle that is H ( for me this is 11") by 2.5". Write 'Fold' on one of the long sides, when you cut it the straps will be H by 5".
Using a tape measure, figure out the length of the leg curve of the front piece and the back piece. Add these numbers together and then multiply by 90%. Draft a rectangle that is this width (for me it was 16"), and 2" tall. These are your leg bindings.
For the bow at the front, draft a rectangle that is 2" wide by 14" long.
Okay, that's all the drafting! Part three on sewing it up to follow...
My blonde head is reeling from all those measurements! I thought of you while I was working on my brother's iPad cover - you're meticulous about measurements and I'm just drawing an outline of the iPad on the fabric and freehanding stuff - ridiculous. The point is to be able to replicate it. I started measuring and writing down things because of you. Thanks for your inspiration.
ReplyDeleteWow, just gorgeous, I'd just pay you to make me one..!!!!! I'm no sewer but oh how I long to be one!! :D
ReplyDeleteI would love to draw the pattern, but the pictures are not available on flickr...
ReplyDeleteSorry about that, Jos, I think they are fixed now!
ReplyDeleteThis looks amazing. Thank-you for doing this! I have been searching for HOURS for a suitable swim suit pattern, vintage, new, whatever. Nothing doing :( I was thinking I would have to try and make my own from cutting up my old suits, but I would much prefer to draft my own. (Why are bathing suit patterns so hard to find!?). Hopefully I can pull it off :) Thanks again!
ReplyDeleteI decided a few days ago to make my own swimsuit. Even though I had decided to just wing it (which is horrible of me as I am a very amateur seamstress) I was looking up tips and advice online and stumbled across your blog post. This is almost exactly the style I was planning on, and now I am going to follow your tutorial and make a beautiful suit! I am so excited now to get started!! Thank you! Thank you! Thank you!
ReplyDeleteThank u so much! Drafting as we speak and I've never drafted before :) I'm an amateur but have made many dresses and things. This will be my first bathing suit. Your design is soo cute and this tutorial is amazing, thank you thank you!!
ReplyDeleteOne minor correction (I think) the straps would be "I" by 2.5, not "h". Unless I'm misunderstanding. We will see when it comes time to sew :)
I've read my bit a couple of times and I *think* we're talking about the same measurements. Length and height are interchangeable (although technically your L is more correct than my H) so we're on the same page I hope :)
DeleteI decided to make my own bathing suit and found your blog! I'm so excited to try this! Although it's not exactly what I want I'm sure I can figure out how to make the minor tweaks I need to! Thank you so much for taking the time to post this!
ReplyDeleteThank you thank you thank you!!This is exactly what I was needing to get started and how to get started. I found stuff I liked online but want to try to make it how I want it which is a tankini with boy shorts but a cute patterned fabric, we'll see if I can find one. Thank you for showing how to lay it out with measurements. Really appreciate the time you took to show us.
ReplyDeleteThank you for the time you put in on these tutorials. Being able to make the pattern from my own measurements, instead of modifying an existing pattern is wonderful. Thank you for including the instructions on measuring and pattern drafting.
ReplyDeleteI'm confused. After I've drafted the bodice, on what line do I cut it out? Is the bodice supposed to come to a steep point and that's how you cut it out? Or do you keep it square on the side opposite the center front? I'm much bustier, and so my bodice came to a very steep point, but if it's pointy how does that point attach to the straps?
ReplyDelete