I've had quite a few emails asking for fitting help so I'm going to delve into some common fitting adjustments here on the blog. If you have a question that isn't covered, throw it into the comments so other people can benefit from the hive mind!
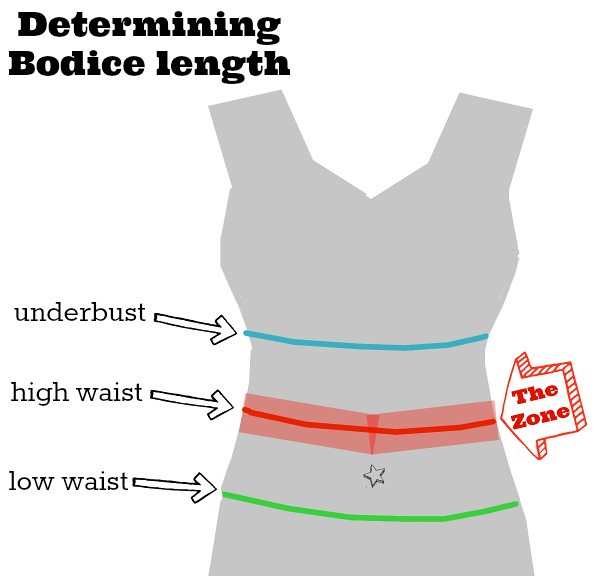
It's clearly your lucky day as I turned pictures of me in my bathing suit into drawings for illustrative purposes. This shows my underbust line, high waist line, low waist line, and an entirely accurate belly button. Although I am slimmer towards my underbust, the intended seam line of the pattern (The Zone) falls around the high waist (if it was at the underbust it would become empire line which might indeed be cute but is not how I designed it). Like a lot of people that may or may not have had children, things become 'less streamlined' below my high waist so the seam falling above and the drape of the skirt should skim over that and be more flattering.
How do you find your Zone?
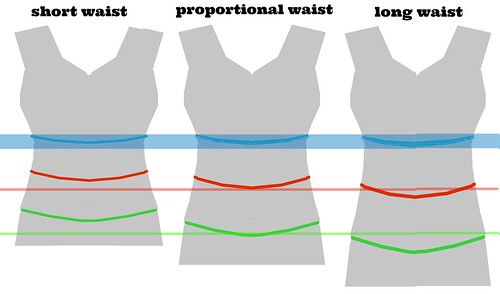
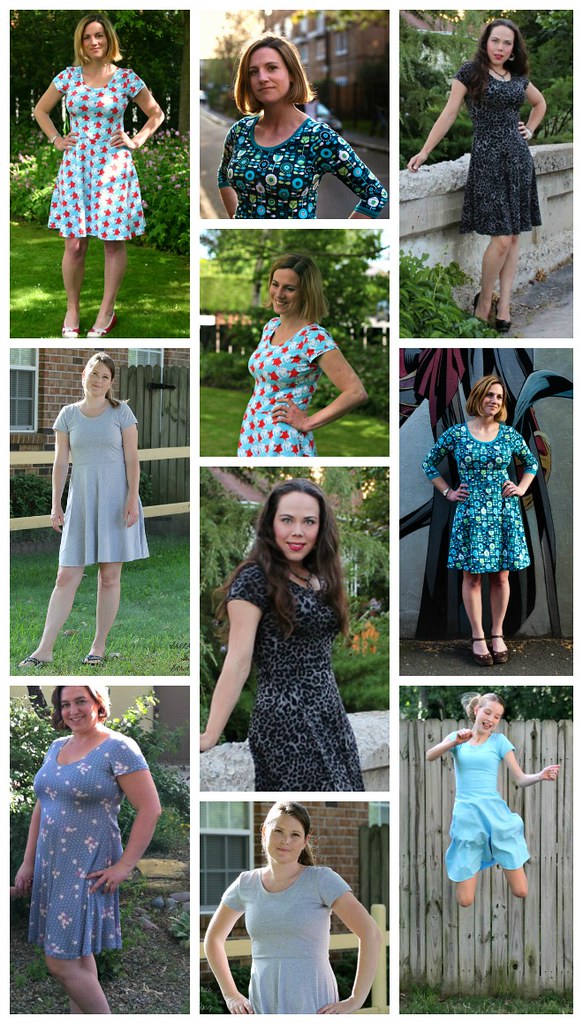
When drafting for grown-ups, there's no way to make a golden pattern that will fit everyone without adjustments. Not only are people different heights and sizes, but the distribution of their body parts varies wildly. The good news is that the Skater Dress only has one really important horizontal seam- the bodice / skirt seam. I am very short-waisted (that's actual me to the left), but I manipulated the pictures to show different torso builds for a proportional waist and a long waist. This is nothing to do with your overall height, but proportions. Although the busts are identical and the underbust lines even, the high waists and low waists shift incrementally. The standard pattern pieces for the Lady Skater are for the
proportional waist in the middle, which means that even I have to make changes to my own pattern to fit me better!
If you have experience of making adult clothes for yourself, you probably have a good idea of your body type but if you're new to this a really useful exercise is to do just as I have: take a photo of yourself in your bathing suit or tight fitting clothes and trace around it. Find your underbust, high waist, low waist, and hip lines and look at how they are distributed. If you're still having having trouble conceptionalising, here are some (fast and loose) indications that you might have to tinker with your bodice length:
- Your overall height. The pattern is graded for a 5'5" woman. If you are shorter than 5'5" or taller than 5'5" you will probably need to utilise the lengthen / shorten line on the bodice.
- Your torso proportions. Again, this takes some body awareness and experience, but if you are short or long waisted you will need to adjust the bodice piece to remove or add height.
- Bust size. This is the least important factor of the three but if you are of the small to average bust you might need to shorten your bodice as less of the fabric is being used to go up and over the breasts. Equally, very large busts might need to add length to the front bodice piece / remove length from the back bodice to have an evenly hanging hemline.
Bodice length adjustments might be something that you're able to do to the pattern before sewing, but you might find that locating your Zone is only achievable after muslining the bodice. If you've made the bodice and tried it on, is it hitting you at your high (natural) waist? Is it too close to your underbust? Is it clinging or pooling somewhere closer to your low waist because it's too long?
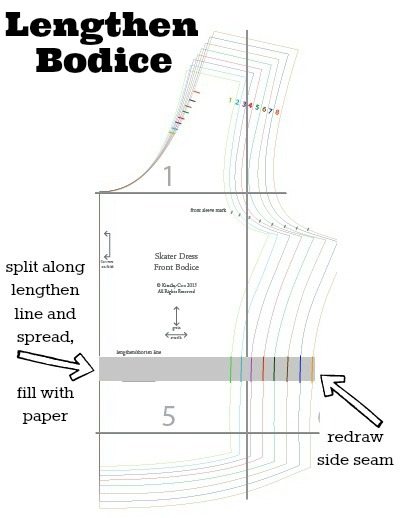
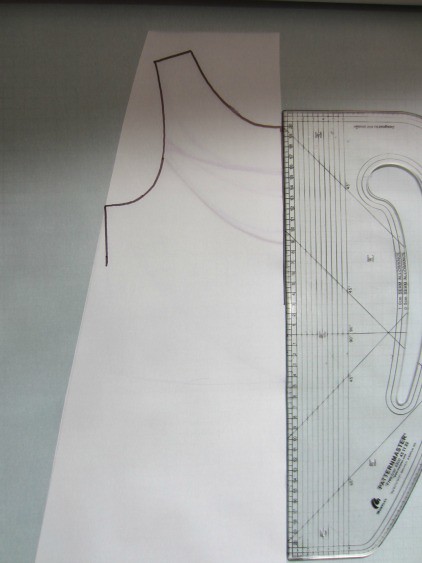
Lengthening your bodice
This is probably the most straight-forward change to make! All you need to do is split the pattern all the way across the lengthen line, add height with a piece of paper underneath, and smooth your side seams. The grey section is what you've added. Make sure you do the same change to your front and back bodice.
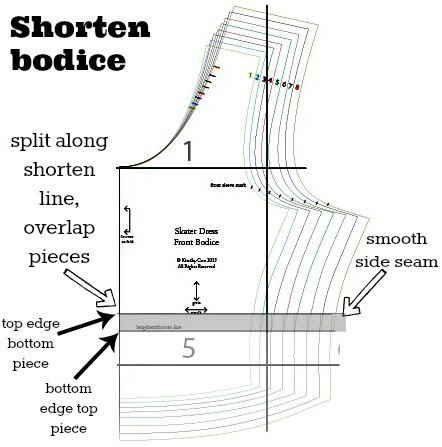
Shortening your bodice
Split your bodice along the shorten line, pull the bottom section up so that it overlaps with the top section (keeping the fold line aligned), and then smooth out your side seam. The grey section shows the overlap. Make sure you do the same change to your front and back bodice.
I'm happy with my front bodice length but my back bodice is hanging lower / I'm having pooling centre back:
As per my tutorial instructions, I highly recommend that you muslin the bodice before cutting precious hoarded fabric. When you make the bodice to ascertain if the waistline is hitting 'The Zone', you might notice when turning sideways that the back bodice is hanging lower than the front. Or- you might not notice until your final dress is finished and you want to know how to fix it. Uneven hems can be very common, particularly if you're busty. Now, I did a sway back adjustment to every size of the master pattern to try to counteract this but your own proportions might mean that you need to make further adjustments. Like the lengthen and shorten instructions above, what you need to do is slash your pattern along the lengthen / shorten line but
do not cut through your size line on the side seam, only cut very close to it. Swing the lower section upwards so that you are overlapping the upper section at the centre back. This probably won't need to be a huge overlap (3/4" to 1"), and tape in place. The centre edge of the lower section will swing over the vertical fold line. Return this line to vertical and (if required) add the same amount of width that you removed at the centre vertical to the side seam. The sway back adjustment is essentially taking a wedge out of centre back to reduce pooling, nothing else is changing in a major way. Depending on how much you removed, you might need to smooth your bottom seam line so it's convex rather than a harsh angle. If you only found this pooling
after your entire dress was complete, try it on inside out and with the help of a friend pull the back bodice / skirt seam up until the hem is even and pin in place. Seam-rip along the centre back (the side seams should be unaffected), remove the excess to the back bodice piece and re-sew.
If you find pooling both at the front and the back your bodice is too long.
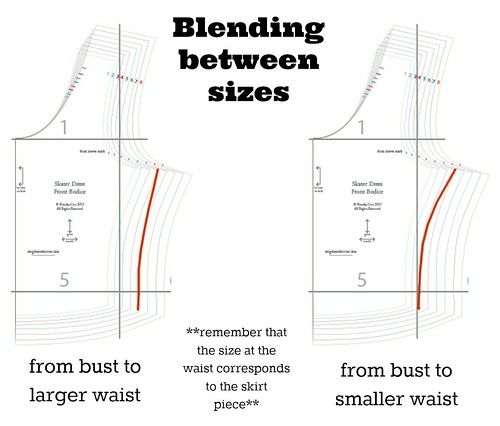
My high bust and waist aren't the same sizes:
When you are measuring your high bust and high waist, you might find that your high bust corresponds to a different size than your waist. The above picture shows smoothing the side seam between smaller bust / larger waist and larger bust / smaller waist. When blending sizes, the majority of the extra room happens in the bust where its needed.
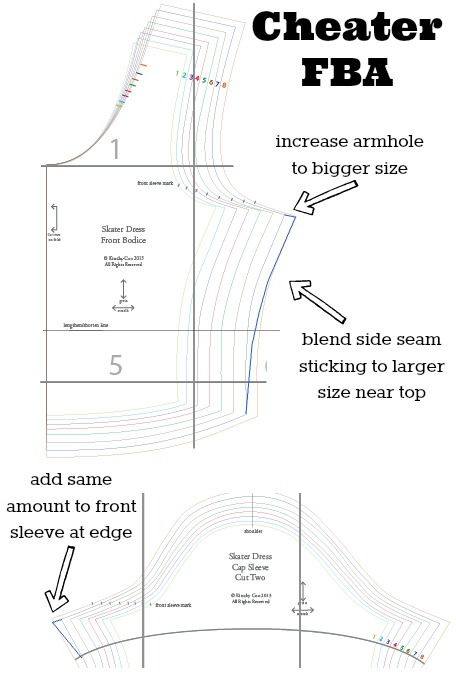
Depending on your fabric choice and your cup size, you might find that you need more room in the bust only. Using a fabric with less stretch capacity like interlock or jersey without lycra might result in a drag line across the full bust. Fixing this is almost the same as blending a larger bust to smaller waist except you're doing it to the front bodice only. Adding extra width to the armhole and upper bodice means that you'll have to also add the same amount to the front sleeve so it fits. If the front bodice side seam becomes slightly longer than the back bodice side seam, ease the extra length into the top half of the seam where the bust is.
**EDITED TO ADD ANOTHER ONE BASED ON COMMENTS**
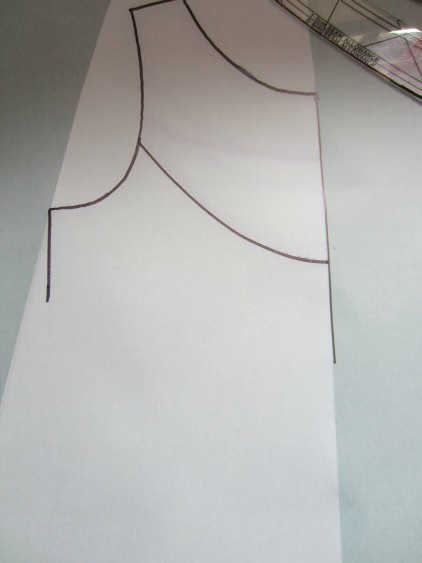
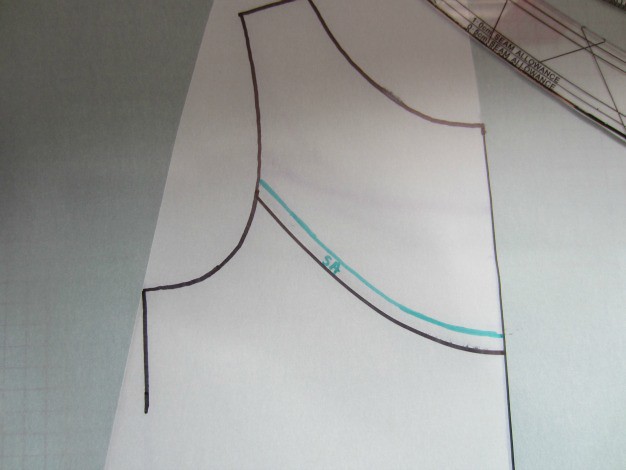
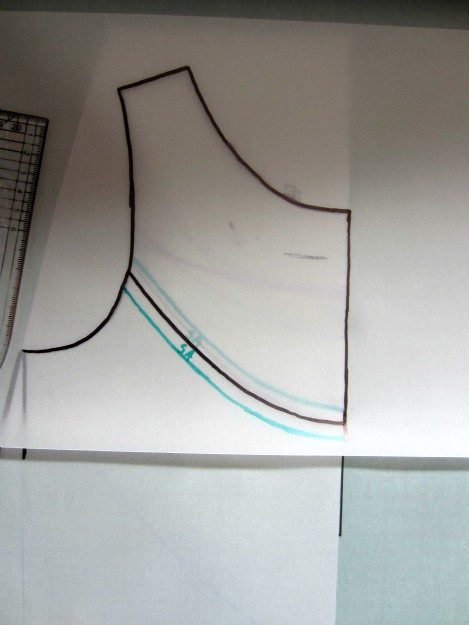
Shortening the shoulder height / Upper bust height:
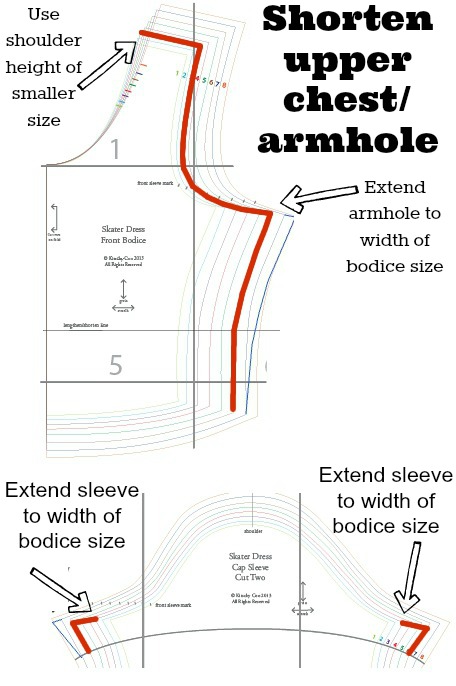
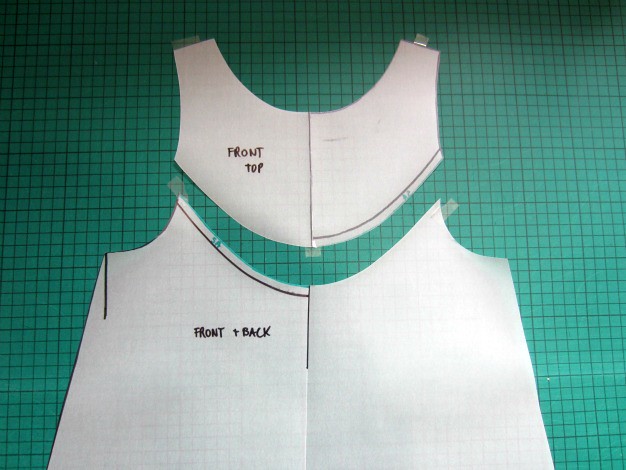
If you find that after making a bodice muslin that there is pooling above your bust towards the sleeve hole, or that the sleeve cap is sitting funky off your shoulder cap, you might need to shorten your shoulder height or shoulder width. With your bodice muslin on inside out, pinch the shoulder seam to bring it up and pin out the excess. On your paper pattern, match the amount you pinned out to the corresponding smaller size (for example, if you pinned 1/4" below the shoulder seam you would go down one size to both the front and back bodices, 1/2" goes down two sizes, etc). Use that armscye / sleeve hole but when you get to the side seam increase the width to your original size. In the picture above (as per Lyn's adjustments in the comments!), I'm showing how to use the upper bust and shoulder of a size 3 with the width of the size 6 in the lower bodice. Use the sleeve of the smaller size but add the extra width at the front and back corners to reflect the size of your lower bodice.
I hope all of this helps! If you have a question about fitting that I haven't covered, chuck it in the comments.