


The tank was

Because Millie asked so nicely about the way I did the binding, here's my compendium of different methods of knit binding. And why I don't like them. Except my own way, which I love.
Method One: Single fold binding
- Binding is folded in half:

- On fold, sewn to the right side of the garment:

- End result flipped up:
 NB: You can topstitch seam allowance back down to the main fabric for a nicer finish, I didn't because I'm in a ridiculous hurry.
 - Why I don't like it: If you're binding a neckline or something super curvy you have to cut the binding much shorter and make it stretch evenly to fit. Too. Many. Pins.


- Binding folded in half and then into quarters:

- Folded to hide raw edges and the bottom fold extend a little bit further down from the top fold:

- Binding encloses raw edge like a sandwich:

- Stitched close to the bottom edge (thereby catching the hidden folded edge on the inside that extends slightly further) The right side:
 The wrong side:
- Why I don't like it: You have too be oh-so-slow and careful to make sure you are catching the hidden bottom edge in a non-ugly fashion


- Binding folded up about a third of the way to give stitch guide:

- Placed to the right side of garment and stitched along press line:

- Binding pulled up and over the raw edges into the inside of the garment and pressed down:

- Stitched on the right side of the garment just below the bottom edge of the binding:


- Turned to the wrong side:

- The excess binding trimmed up to the stitch line:

- The end result:


- Why I don't like it: It's honestly not that bad, but I don't love the trimmed raw edge. That's the kind of thing that shops cover up with a coverstitch.
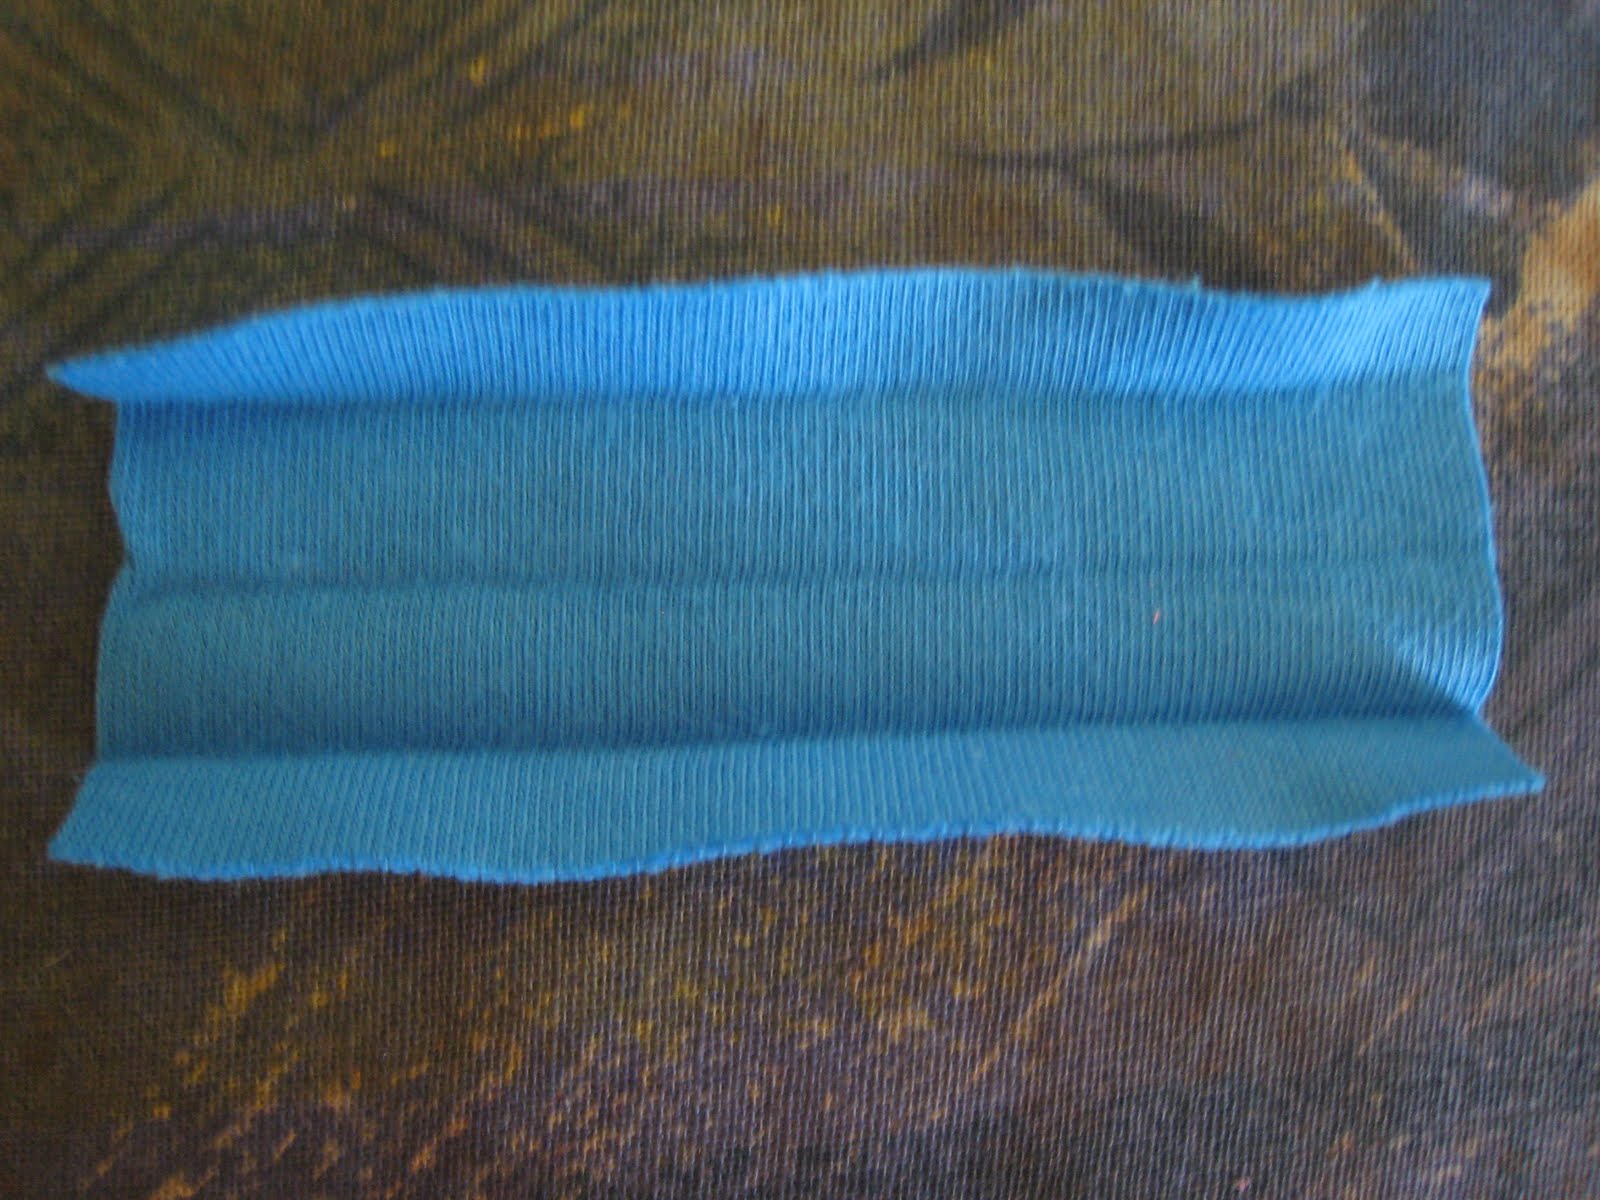
- As per Method One, fold binding in half but put it to the wrong side of the garment:
- Once stitched, flip the binding to the right side:

- Fold it over so that it encloses the seam allowance. Roll it a tiny bit so the edge of the binding is still visible from the wrong side (otherwise known as Don't Drag the Wrong Side of the Garment Up and Over So Everyone Can See It). You should be able to feel the seam allowance hiding inside.
- Stitch the binding down close to the edge from the right side:
 Pardon the skipped stitches, my machine was being an a**hole.
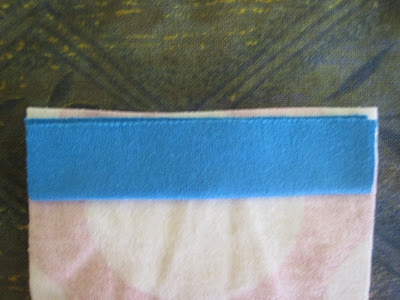
 - The wrong side looks nice too (and see what I mean about a tiny bit of the binding still visible from the inside):

- A better picture of both sides when machines are being cooperative:

- Why this method is awesome: Good looking from both sides, and you don't need to cut the binding smaller than the neckline and stretch it to fit.


I LOVE this post so much!! Thank you for explaining all of that to me - knit binding had me completely flumoxed until now!! Thanks!
ReplyDeleteManda - treefall design
Thank you! I am spatially impaired so I was having a hard time picturing what you were describing. Also a major reason why Big-4 patterns make me cry.
ReplyDeleteGreat tutorial. Know what you mean about *@!* sewing machines, Mine was being a pain last night in the middle of a lovely embroidery. Still got it done in the end.
ReplyDeleteWonderful!! I have been using the Ottobre method, but wasn't a fan of the yucky un coverstitched edge either. Now I don't have to run out and get a coverstitch machine!
ReplyDeleteWow. I am so impressed at how clear your words and images are. Thank you for your time in putting that together!
ReplyDeletebrilliant! thanks for sharing...next week when things calm down here (son is graduating...from. high. school.~~hyperventilating~~) I will attempt a bathing suit for Lilz using your boy cut briefs pattern and a pattern I have for a tank top...i'll post a photo on your flickr group :)
ReplyDeleteOoh, I like this method a lot, thank you! I've tried a variety of ways of doing it (including by hand because I am apparently utterly wrong in the head) and I think yours is going to be my favourite. I'm working with some very slinky jersey at the moment and shall report back.
ReplyDeleteHAHA! You're a cheater like me! Shhh! Don't tell too many more people... -wink. Excellent explanations!
ReplyDeleteAllie
alliemakes.blogspot.com
Thank you, thank you! I have tried the first 3 methods, with mixed results. I sew mainly Ottobre and only had their methods to go by.
ReplyDeleteI must remember to "ask nicely" in future, it gets results!...Thanks again for the time you took to do this.
I never tried binding this way, but I have to say I am intrigued and will definitely try this! Thnx.
ReplyDeleteWhere do you buy your gorgeous knit jerseys from? I love that red and white print knit on this top.
ReplyDeleteThis is brilliant!!! I'm a new blogger sewing mum and crafterhours sent me on your blog address as you are this side of the pond too (I'm in Yorkshire, UK). I love this tutorial, but can I ask is the binding bought or just some jersey cut on the bias? I'm trying to make some bibs for a girl with special needs and wanted to bind with jersey rather than cotton but on the bought bib's I've seen it was ribbed??? If you get chance to reply (accept you are prob v busy) the post is on my blog about the bibs - http://bella-boutiqueuk.blogspot.com/2011/02/fun-helping-others.html
ReplyDeletemy heart is beatting fast! I am so excited to see a binding that might inspire me to sew with knits again....binding knits has been a real nightmare for me. thanks!
ReplyDeleteI really appreciate you taking the time to post this! Your method is awesome. It opens the door to a bunch of projects I have wanted to do but was too afraid because of binding with knit! Huge thank-yous from a Dubai mama!!
ReplyDeleteWell, DUH! Not "duh" as in, of course we already knew that - "duh" as in, "why the heck did I not ever think of that?!" It makes so much sense. This is brilliant!
ReplyDeleteThis is fantastic! Thanks for posting with such clear instructions @ pictures!
ReplyDeleteThis is a great tutorial! But I have what is probably a "duh" question. If you're binding a neckline using the Kitschy Coo method, do you need to shorten the piece of binding? Or does using a serger keep the garment neckline from getting distorted? (Hope I'm not posting multiple times... having operator issues with the comment form!)
ReplyDeleteI don't think you need to shorten it if you're planning on flipping it over. Maybe 10% shorter depending on the pattern:)
ReplyDeleteOh thank you thank you thank you!
ReplyDeletevery nice thank you so much
ReplyDeleteThank you for sharing. Just tried your method and it came out great.
ReplyDeleteI've only just re-entered the world of sewing, and had forgotten a lot. Your neckline binding is genious! So much easier than the way I used to do it. Thank you.
ReplyDeleteTotally awesome binding method. I just want to make a bunch of knit stuff now so I have an excuse to use it over and over again. Thanks for sharing! I linked to you in this post where I gave it a try :)
ReplyDeletehttp://bethbeingcrafty.blogspot.com/2013/03/fake-out-henley.html
i've been so afraid of knots and binding is one of the reasons, as i don't have a serger yet. *cough cough* *pokes husband* *cough cough*
ReplyDeletei really like your method. i absolutely DESPISE exposed edges... i'm the type that french seams and felled seams pillowcase dresses... pajama pants. EVERYTHING. I cannot abide and exposed seam of fabric edge. none of that lazy zig zag and hope for the best for me!
i am going to try this! thanks!
melle@wwww.featheredruffles.com
I feel like I have tried about a dozen ways of attaching knit binding, and THIS is IT! Thanks so much for sharing it--I just knew from the "grumpy person" title that your method would be the one for me. I linked to you in my blog post here, where I tried it out for the first time.
ReplyDeletehttp://bethbeingcrafty.blogspot.com/2013/04/cap-sleeve-copycat-tee.html
OOO, I think I love you, I love you so much. I have recently finished a simple tank top like the one pictured in this blog entry and I am so bummed at how the binding at the shoulder seams turned out. The insides seams look horrible with the single fold method I used. The outside looks great, but because the seams are so bulky (even after grading them down) that it has a tendency to flip the binding so they show when worn. I pressed the heck out of every seam before and after I sewed and it lays flat only if I don't move my arms (lol.) The only solution was to topstitch, even though I don't like the look of the extra seam, but it still does not stay perfectly flat all the time. This will totally solve my problem!
ReplyDeleteI have got to try this! I feel like I have tried every method out there, but I still end up with wonky seams. Can't wait to see if this works for me!
ReplyDeleteI lke it very much!
ReplyDeletethis is a wonderful tutorial, thank you! I have sewn a few knit tops and can never get the necklines just right so I will definitely be trying this! How do you bind knit tops with a V-neck?
ReplyDeleteYour finish looks really cool. I will have to try it next time! I especially like the "you don't need to stretch and pin it" part :-)
ReplyDeleteThank you! I am trying to duplicate a Boden top that has the binding on the inside and it the last method that is going to do it.,
ReplyDeleteThank you! I am copying a Boden top and they have the binding on the wrap neck so that it is in the inside. I couldn't figure out how to do it so it would look nice on both sides. Your last method is perfect!
ReplyDeleteWell, I have been sewing for Frumpty years and have never read such a comprehensive and thoroughly useful Tutorial on binding. Thank you so very much. I shall be using the 'Kitschy Koo' method henceforth! Brilliant!
ReplyDeleteOkay, I have a complete novice question. Can I use a bias tape make to make the binding? How does one make the binding? I've seen your your Casual Lady tops that the binding is the same material as the body of the top.
ReplyDeleteFor the Casual Lady tops (and any other knit project where I use self fabric for the neckbands), all I do is cut a strip of fabric horizontally about 1.25" to 1.5" high and about 85% of the length of the neckline. Fold it in half and press, then sew it on while stretching gently, then press the seam allowance down towards the garment and topstitch with a 3.1 length straight stitch. Provided the fabric I'm using has reasonable stretch you don't need to cut it on the bias, just horizontally in the direction of stretch.
DeleteI love it when someone messes about with ideas and it all comes good! This one is really neat.
ReplyDeleteBrilliant! In the red and white top is that ribbing that you used that has a 4-way stretch (i.e. as opposed to being cut on the bias since the binding is going around curves)
ReplyDeleteIt's a cotton / lycra with a four way stretch. You shouldn't ever have to cut knit bindings on the bias if they have sufficient stretch :)
DeleteI just tried your method and it's AWESOME! It's the best knit binding I ever made!
ReplyDeleteI still need to tune it a bit because my topstitches are sticking out a bit from the fabric (probably I pulled the fabric too much while topstitching, or I used the wrong thread tension, I always fear the final result would not be stretchy enough...) but this is something I will improve with practise.
Thanks for sharing your method! :-)
I just stopped making an Ottobre kids tunic because it got to the neck - it's late, I have made a cock up before and I have had enough but this? Bloody Brilliant, will try it out tomorrow. Jo xx
ReplyDeleteWish I had come across this much sooner. Great tutorial and very clear.
ReplyDeleteWoohoo...thank you so much...now I'm offline to go play with my sewing- & serger-machines :)
ReplyDelete