
When I wanted to make some mittens for the kids, I found a lot of tutorials for two piece (front and back) mittens with the thumb to the side but no tutorials for mittens with an opposable thumb piece. It does take a
teensy bit longer, but I prefer the shape and think it probably offers a greater range of motion for grasping things like scooter handlebars. So here goes, please make some!
- Prepare your pattern pieces. These specific dimensions fit both my 2 year old and four year old. You should be able to click on the picture and print to the actual scale, but if not the dimensions are roughly 6.25 inches tall, 3.75 inches wide with a rounded top and a slight narrowing 1.5 inches from the bottom, with a thumb that's just under 2 inches tall and 1.75 inches wide with a rounded edge and set in half an inch. There are 1 inch squares below each piece to check if it has printed to scale. By increasing the scaling you should be able to make them for bigger kids / adults too as the proportions stay the same.
 The white mitten to the left is the back piece. Where it is shaded blue in the middle picture is the bottom piece. The red section of the picture on the right is the top piece. The thumbs are the same size, and the slight overlap of top and bottom pieces form the seam allowance so that when they are sewn together, the resulting piece is the same size as the back piece. Awfully wordy, but it makes sense! Seam allowances are .25 inches. Okay, now to the easy bit...
- Cut two backs, two bottoms and two tops. It's easier if you cut on folded over (double layer) fabric so you automatically get left and right, but if you're doing one at a time make sure you flip the pieces over so you don't end up with two lefts or two rights!

- Right sides facing, put the top and bottom pieces together so the thumbs are lying on top of each other and pin the layers together. You're going to stitch along the blue line, pivoting on either side of the thumb.

- Once it is sewn, trim the excess close to the seam to reduce bulk.
 NB. This is possible because I'm using fleece / knit. If you're using a woven be careful not to cut too close to the stitch line because it might pull out. Consider overcasting with a small zigzag after trimming to make more secure.
 - Cut two small lengths of quarter inch elastic to attach to the narrowest bit at the wrist. The pattern is 3.25 inches, and I cut the elastic 2.75 inches each as my son's wrists are 5 inches around. Tight enough not to fall off, but doesn't cut into him either. Where it narrows, stitch one end of the elastic to the wrong side of the fleece, going back and forth several times to secure. Make sure you secure it about 3/8" in from the edge as you don't want to trim off the stitching later!

- Fold the mitten so you can repeat the process on the other side.

- Switch to a wide zigzag (I use 5.0 width and 4.0 length) and stitch over the elastic, with one side landing to the right of the elastic and one side to the left (i.e. no actual stitching hit the elastic). Stretch the elastic taut as you go.

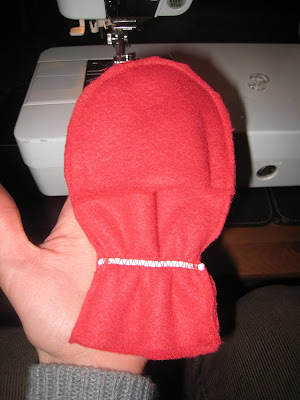
- After you are done, this is what it'll look like:

- Repeat the process to the back piece, securing the elastic to the wrong side.
- Right sides facing, put your front piece on top of the back piece so the thumb is to the middle. Matching at the hem, at the elasticated wrist, and along the top curve, pin the layers together. Stitch from one bottom corner around to the other bottom corner.
- Trim close to the stitch line to reduce bulk but make sure you don't cut any of the stitches that secure the elastic!
- Turn the raw edges at the bottom up a quarter inch, pin and hem.

- Find a child and a scooter and you're done!


 When I wanted to make some mittens for the kids, I found a lot of tutorials for two piece (front and back) mittens with the thumb to the side but no tutorials for mittens with an opposable thumb piece. It does take a teensy bit longer, but I prefer the shape and think it probably offers a greater range of motion for grasping things like scooter handlebars. So here goes, please make some!


That is so awesome!
ReplyDeleteThanks for sharing your pattern and tutorial.
I'm going to make up a bunch in the same material and color... no more orphans! LOL
"Oh, what's that? You lost one of your mittens?
Here you go!" :)
This is great!! When I saw your mittens yesterday I thought - I need to do that, but had no clue how to do the thumb. You read my mind. Weird...
ReplyDeleteOooh I have some nice fleece I think I might have a go at making Elise a pair.
ReplyDeleteGlad to hear my tutorial will be of use! Despite me being over-wordy, they are really, really easy.
ReplyDeleteActually, Katie, the ones I made for Maia were slightly more complicated with a three piece palm (main piece and two curved thumb pieces) but although that's more anatomically correct it was also over-complicated for toddler mittens! This is version two and so much easier.
Wow, your timing is great! I have mittens piled up on my sewing table, and was trying to figure out how to make the pattern. Do you have an actual pattern that you would be willing to sell/share?
ReplyDeletefound it! thanks! I'm a little more awake today...
ReplyDeleteThank you. I never ever thought about sewing glubs as my littly calls them. Very inspirational.
ReplyDeleteThanks, you rock! I posted the mittens on my blog today with a link. Off to sew something else during today's nap...
ReplyDeletevery easy to follow tutorial! I just put up a post of my version. Used your construction idea but made my own pattern based off of my favorite mitts
ReplyDelete