
Participants who pre-ordered their Dolman Top patterns should now have their files and are (no doubt) chomping at the bit to get started. But before we get down to the making and the doing, how about a handy recap all about sewing with knits?
Sewing knits on a regular machine:
I wrote another post about this yonks ago, but sewing knits on a regular machine is totally do-able. Actually, once you've figured out what you need to change on your machine to sew knits successfully, you might even find knits easier than wovens.
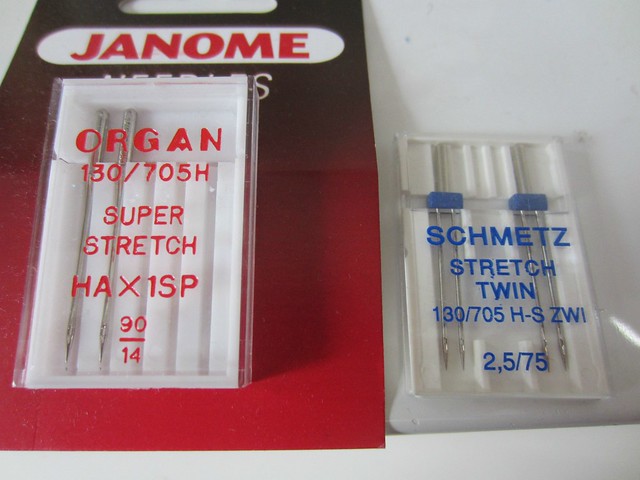
So here's the most important thing you need to sew knits on a regular machine: stretch (ballpoint) needles.
A stretch needle (as you can see above you can get stretch double needles too) has a sharper, finer head that is able to slip between the fibres without stretching, catching or even breaking them. Just like conventional needles, there are different weights. The 90/14 above would be better for heavier weight knits as it has a higher number, 70 or 80 would be used for finer knits. A normal, non-stretch needle is more likely to skip stitches (and probably lots of them!) and is more likely to result in wavy stitch lines.
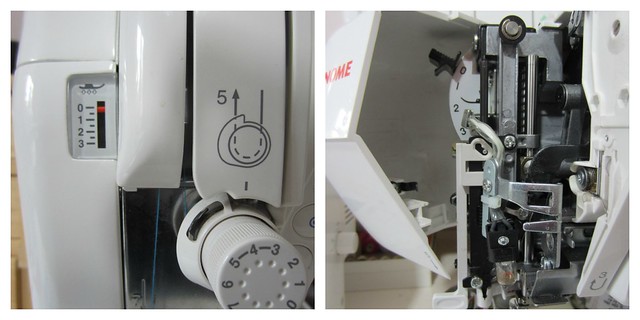
The other thing that helps so much to improve the appearance of your stitches is if you can adjust the pressure on your foot. The more pressure that is being applied as you sew, the more the feeds compress and pull your fabric through. When your machine is left in charge to do the feeding it is also stretches the fabric out at the same time and this can result in the telltale wavy stitches.
Both my Janomes have the ability to adjust the pressure on the foot. On the machine to the left you can see a dial that can be turned between three (more pressure) and zero (least pressure). For the machine on the right, you flip the panel open and adjust from three to zero with the flick of a switch. Once the pressure has been reduced, you will need to do more of the feeding yourself. Guiding the fabric towards the foot while gently pushing / pulling from behind (where you have already sewn) keeps the fabric moving without stretching it out in front of the foot. I use my thumbs to control the fabric before the foot and my other fingers behind the foot to keep it moving.
If you don't have the ability to adjust the pressure on your machine, I believe you can mimic the affect by using a walking foot. However, I don't personally have one so have a Google about! Better yet, have a nosy about in my Pinterest board all about Sewing With Knits :)
Different type of stitches for knits:
On my serger, I tend to use a four-thread overlock. Rather than chaining on and off, I start from a position about an inch away from the end, sew to the end, lift the foot, gently pull so the threads are released a tiny bit, then flip it over and sew back down the way I came, and repeat the flip on the other end. I don't have any specific pics of this but because I use different coloured threads in my needle spools you can see how about an inch on either side has be flipped and re-stitched on the other side.
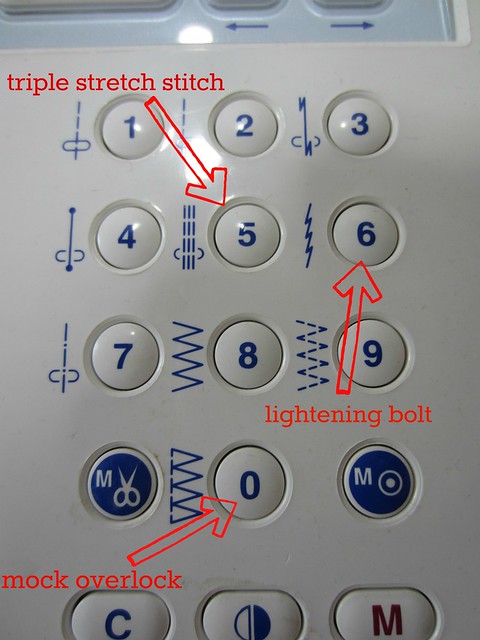
On a regular sewing machine, there are several knit stitches that will possibly (and hopefully!) be pre-built into your machine. These are the ones I have used the most:
If you don't have pre-built stretch stitches, the lightening bolt is the easiest to mimic manually as it is essentially just a narrow zigzag; the distance the stitch travels horizontally is less than the distance it travels vertically. For hemming and seams that I want really, really secure (like my bathing suit!) it's triple stretch stitch all the way. And finally, if you want to mimic a serger and bind the raw edges at the same time, a mock overlock is for you.
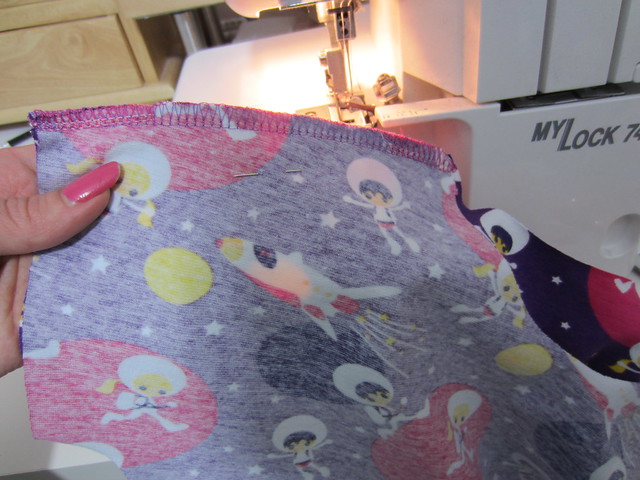
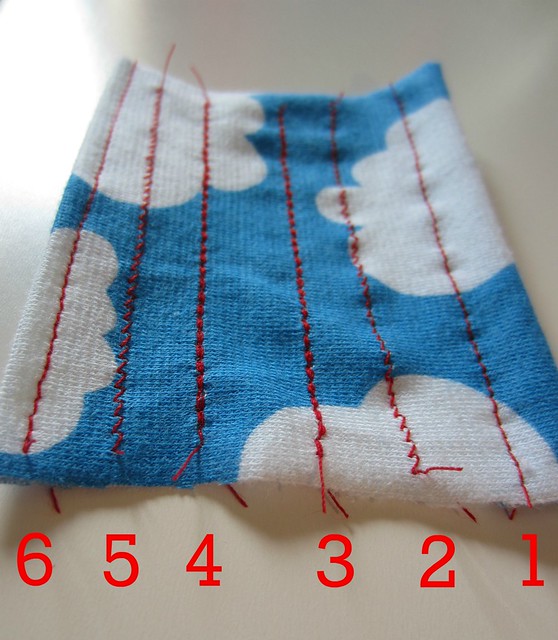
To demonstrate different stitches and the effect of appropriate needles and foot pressure, here's a handy visual:
- The fabric has been folded over and hemmed with a normal straight stitch without lessening the foot pressure or changing to a stretch needle.
- Standard lightening bolt stretch stitch without lessening the foot pressure or changing to a stretch needle.
- Triple stretch stitch without lessening the foot pressure or changing to a stretch needle.
- Triple stretch stitch with the pressure on the foot reduced to minimum and the needle switched for a stretch one.
- Standard lightening bolt stretch stitch with the pressure on the foot reduced to minimum and the needle switched for a stretch one.
- The fabric has been folded over and hemmed with a normal straight stitch with the pressure on the foot reduced to minimum and the needle switched for a stretch one.
The other thing to mention is that almost all wavy seams can be improved (if not cured) by a really good press with the iron. Seriously, do not underestimate that iron.
Hemming knits:
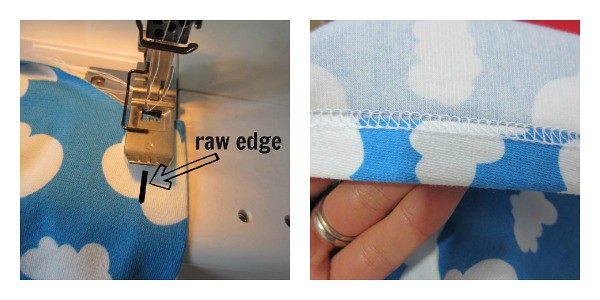
I tend to hem with my coverstitch machine purely because I have one and I love it, but you can get a similar result using a double needle. When you use a coverstitch or a double needle, you sew with the right side facing up which can take some practice. Ideally, you want your needles to straddle the raw edge with one needle falling to the left and the other to the right. Underneath on the wrong side the threads are woven together to cover the raw edge while offering some elasticity. You can also sew so that both needles hit the folded fabric and then trim with your scissors up to the stitch line, but don't get your stitch lines too close to the edge or your hem will tend to flip over. As you are sewing with the right side up, it can be tricky to remember where the raw edge is. You can use chalk to mark on front where the edge is, but I find that pressing really well leaves a ridge I can feel with my finger. Keeping the foot a uniform distance away from the edge helps too.
For a better explanation than I could do about double needles on a regular machine, scroll on down this post on The Snugbug.
If you don't have a double needle, never fear! A regular machine and single needle is fine, and the good news for you is that you can sew wrong side up and can see what you're doing. You can use your lighting bolt stretch stitch (a narrow zigzag if you're manually setting your stitch) or a triple stretch stitch close to the edge, and then trim away the excess fabric close to the stitch line. Did I mention how much I love triple stretch stitch? I think I did once or elevety times but I will say it again: I love it. Very nice for hems. And finally, specifically for the Dolman Top (or other similar styles and fits), as this is not a particularly tight fitting top the hem shouldn't be under too much strain for a little bit of straight stitching. Set your stitch length to a bit longer (like 3.5) and sew all the way around close to the edge, and then do a second row of stitching 1/4” away from your first line. Viola, it'll look just like a double needle hem but with a single needle. Don't do this for tight fitting clothes or for children who enjoy stretching their shirts over their knees, unless you really like restitching things.
____________________________________________________________________________
I hope this helps alleviate some Knitphobia! Feel free to add any suggestions to ask any questions in the comments. Back tomorrow when we get down to some serious Dolmaniac bizness.


I'd never tried that serger trick before, but it is pure genius!! I used to thread the serger tail onto a darning needle and thread it back through the seam to secure it. Your way is a million times better.
ReplyDeleteIt really is such a time saver and makes it extra secure. Then I just pull and snip off a couple of inches and do a quick double knot before cutting the thread :)
DeleteI feel really guilty (lazy) about just cutting my serger threads now, but my mom will be happy I found your method! Also thanks for the awesome visuals of the 6 rows of stitching - very cool.
ReplyDeleteYou're welcome!
DeleteIs that what that triple stitch symbol thing on my machine is for?!! well I never! Thanks for that. And I agree - that serger trick is genius. Like Kid,Md above, I always thread mine through a darning needle and weave it back into the seam. I'm doing it your way from now on!
ReplyDeleteSeriously, try the triple stretch stitch and you'll love it. It's not very fast because it goes back and forth so much but you can normally do it without even feeding the fabric at all. It just pulls itself through :)
DeleteOooh I can adjust the foot pressure. I'm going to learn so much about my machine doing this sew-along.
ReplyDeleteHaven't read the whole post yet, stopped at the pressure to check my manual. Will have to read the rest later, school run and playdate now :D
How timely you are! My gorgeous fabric arrived today (thank you), it'll be a little while til I break into that though ´cos the instructions for my serger came today too!, so I can finally play and learn. I may just join in with my regular sewing machine for now, all the while practising like crazy with the scary machine that has 4 needles and a knife! If you don't hear from me for a while....
ReplyDeleteV useful post, thank you. I have yet to work out the tension on my overlocker - I have it sorted for wovens but am struggling with knits, so this will probably be a normal machine sewn project. I only have 6 stitches on my retro Bernina, and they don't include lightening bolt or triple stitch, so I'll just use zigzag. Might experiment a bit with a double needle though...exciting!
ReplyDeleteGot the pattern, got the fabric, had a little read and now have my stretch needles (single and twin) on order! Yay!!!
ReplyDeleteWhat a great post--thank you for all the tips and for the visual on the different stitch settings. I've started using the triple stretch stitch for topstitching and love it for that! (I haven't used it on knits because I normally serge/use a twin needle)
ReplyDeleteTHANK U FOR THIS INFO...U ARE AWESOME!!!!!!!!
ReplyDeletethat is SO simple, but so brilliant! I want under the impression that you couldn't sew jersey with a standard machine. Looks like I was wrong :)
ReplyDeleteNew to knits. a little obsessed with some hoodies I have just made. But I am having a hard time finding good not cutsie knits. Any suggestions?
ReplyDeleteI have a question...if you are taking in something that is knit - like the sides of a t-shirt, what is the best stitch to use?
ReplyDeleteI would use the lightening bolt stretch stitch if that's a option on your machine. If you don't have pre-built stitches you can replicated it with a standard zig-zag by adjusting the stitch length and width. I'm not near my machines at the moment but I'd start with something like .5 wide and 1.5 length on a scrap knit and then test it for stretch (how much does it give you?) and durability (does it break?).
ReplyDeleteChar Nov 21,2014 Thanks sewwwwwwwwwwwmuch. I am just preparing my sewing studio(the whole Living room) who needs a sofa. to start sewing knits. I invested in a blindhem machine, cover stitch machine and a new serger. This will be sew much help.... Thanks for the help.
ReplyDelete