

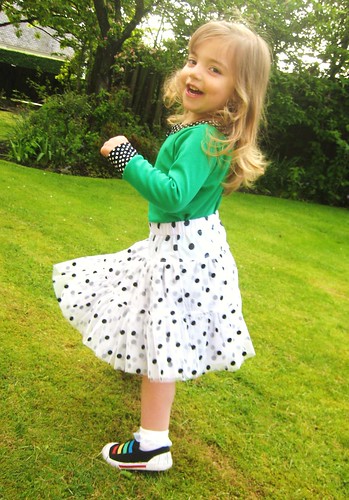
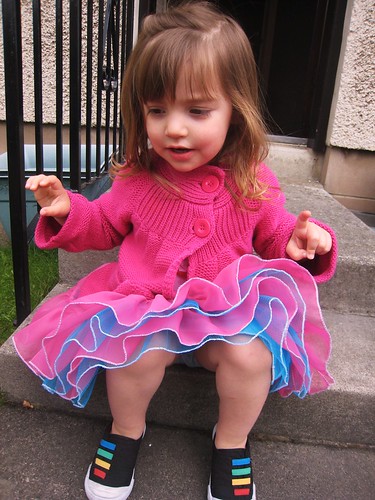
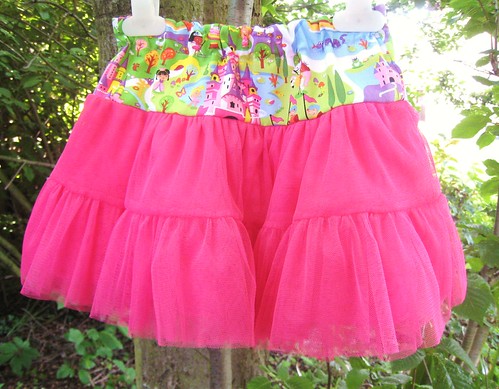
Since there has been some interest in a tutorial for the tutu pettiskirts I've been making, here we go then. This is a three tiered pettiskirt with a number of twirly girly skirts coming out from a drop waist and a lining skirt underneath. You can use all the same tulle as the picture above. Or different colours as below.
Some explanations as to the design. As you might have read, I was a reluctant convert to the toddler tutu. Beyond being more girly / princessy than this tomboy mum could handle, I just didn't like the proportions of a gigantic pouffey skirt on such short little legs. This is why I've made mine drop-waisted with all the swishy pouffey bulk from the hips down. And you can use a fashion fabric for the top tier for a bit of character. And it saves some gathering time. Triple win. The other feature I've added to the pettiskirt is a lining skirt to the same proportions underneath. Many reasons: tulle can be scratchy so this protects the legs, it gives coverage so there's no hint of underpants showing through, and it also gives it structure so you can get away with making perhaps less tulle skirts than you would have without it. Which means less gathering time again. Hooray. You can also use fabrics like voile or organza but bear in mind that you will have to edge finish everywhere because it unravels if you so much look at it, and you'll also need to add a hem allowance to the height of the bottom tier.
Off we go then. I'm including the calculations for drafting your pieces with your own measurements, but will include the actual numbers I used for two year old and three year old skirts as well.

These are the three tiers you'll need. If you have a smaller child with straight up and down shape, use the waist. If you have an older child (or you're doing it for an adult!), use the larger of hip of waist circumference or you won't be able to get it on. When I say a minimum of 6" ease, feel very free to increase this but beware that it will increase the fabric required (and that pesky gathering) for Tiers B and C quite a bit. When I say a minimum factor of 'times two' for the widths of Tiers B and C, depending on the fabric you are using you might want to make it even more. In general, the density of the tulle (i.e. the size of the gaps in the webbing) means that you might not be able to see the true colour unless you have either tightly gathered it or you have a lot of layers. I prefer denser tulle / netting with a smaller weave for this reason.
- Elsie is two with a 20" waist circumference and I want the finished length to be 10.5". Tier A will be 26" by 4", Tier B will be 52" by 4" and Tier C will be 104" by 4".
- Maia is three with a 22" hips circumference (bubble bum!) and I want the finished length to be 12". Tier A will be 28" by 4.5", Tier B will be 56" by 4.5" and Tier C will be 112" by 4.5".

You will probably need to make a minimum of three tulle skirts, but more depending on the density of your tulle. I used four for the one that is being used for this tute, but six for the one above that uses two different colours.
- For Elsie: Piece A measures 13" by 4".
- For Maia: Piece A measures 14" by 4.5"

It is helpful once folded to pin the layers together at the selvage side so they don't shift around. In this picture you might be able to see the pins on the right side, and on the left side is the fold encorporating two layers. Cut pieces as required from your calculations.

Divide your cut pieces into skirt stacks of Tier B and Tier C. Making four tulle skirts means four stacks of six pieces (two for Tier B and four for Tier C). Dealing with each stack individually saves a lot of confusion.

Sew the short ends of two pieces together. Sew quite far from the edge or your machine will eat it and you will swear like a sailor. Repeat on the other side. You now have a Tier B. Sew the short ends of four pieces together, paying very good attention to make sure that all the exposed edges will be facing the same direction. When you sew your final seam to make it a loop, double check to make sure the long length hasn't twisted around. Again, it saves on crying / swearing time. You now have a Tier C that is massive.

Trim all of your seam allowances close to the stitch line to make them less noticable.

Fold your Tier B in half, matching the side seams, and place pins at centre front and centre back (far right in this picture). Repeat these steps for all four skirts, but keep them in their separate stacks.

Run gathering stitches along the top of Tier C, starting and stopping a new one at each seam (i.e. four separate gathering stitches) as this is much easier than a single gathering stitch. Turn your tension up and your machine will gather for you but make sure you leave long tails at both ends because it might over-gather.

This is what it looks like after you run your gathering stitches.

Right sides facing (as in no exposed seams to the inside), pin each seam line of Tier C to the corresponding quarters of Tier B (as in seam line, centre front pin, seam line, centre back pin). Pull on your gathering stitchs in Tier C to gather more or let them out to match Tier B for all four sections.

Adjust the gathers evenly and pin copiously.

Sew the layers together with the gathers facing up so you can readjust a bit while you sew if required. Smooshing the gathering down with your left hand as you sew will help them not to shift. Make sure you sew either right along your gathering stitch or to the inside of it so it won't show when open.

Once you have sewn a whole revolution, remove pins and pull layers apart. Tug both sides gently and inspect the whole way around to make sure you have caught both layers. Repeat these steps for all four tulle skirts.

When all four skirts are finished, place one inside of the other (with all right sides out) and pin all four layers together at both side seams. Make sure no skirt is twisted in the inside.

Then pin them together along the entire top raw edge, making sure you get all four layers captured and that they are even. Run gathering stitches along the top edge (again, two separate stitches stopping and starting at the side seams).

Sew the two Fashion Fabric Tier A pieces together (right sides facing) along the short ends to make a left and right side seam. Sorry this bit doesn't have a picture but it doesn't really need one anyway! Right sides facing, pin the top raw edge of the tulle multi-skirt to the bottom edge of Tier A at both side seams. Make sure that if your Tier A is directional that it is facing the right direction! And then pull your gathering stitches to match the width of Tier A and pin evenly.

Sew them together all the way around either on the gathering stitch line or inside it so it doesn't show when pulled down. Put aside for now so you can make the lining skirt.

Cut the lining skirt pieces for all three tiers as set out in the table at the the top. This picture is slightly confusing because there are four stacks instead of three, but from top to bottom they represent: 2 x Piece A on fold for Tier C, 2 x Piece A on fold for Tier C, 2 x Piece A on fold for Tier B, and 2 x Piece A for Tier A. Sew the short edges of Tiers B and C together just as set out above. I'm using satin for this one, so the unravelling hellish nature of the satin means I've switched to my serger. You don't need a serger, but you will need to edge finish if it's an unravelley fabric, like with a zigzag.

Once Tier C is in a big loop, hem the bottom edge. I roll hemmed this one, but you can double fold up or even bias bind if you're truly hard core. The end result should be slightly less in height than the Tier C of the tulle skirt though, because you don't want it to stick down further and be all exposed. No sir-ee.

Keep following the process that you did for the other skirt and you will end up with this.

Now you're going to put the tulle skirt inside the lining skirt, match at the side seams and pin them together along the raw edge at the waist. It's decision time for you. The lining skirt can either be sewn in so the right side is facing the legs (no exposed seams for the legs and potentially reversible) or you can sew it so the right side is facing out like the rest of the layers (if you don't have many tulle layers or it's particularly sheer this is the best option). Up to you! But it will determine which way you pin the skirts together. If right side is facing the legs, pin the two waistbands together right sides facing. If the right side is facing out, pin the wrong side of the lining skirt to the right side of the fashion fabric. For this one, the lining skirt is facing out, and you can see how the wrong side of the satin is pinned to the right side of the Fashion Fabric.

Sew them together all the way around.

When it's pulled open it looks like this. Push the lining skirt into the tulle skirt, smoothe down along the top edge (press if needed), and pin so the layers don't shift.

Starting half an inch away from the side seam, sew around the waistband one inch away from the top, stopping half an inch before the same side seam.

You must leave that one inch gap to get your elastic in.

Cut a piece of elastic that is one inch shorter than the waist circumference, and thread it through the channel through the gap between the two skirts.

Overlap the ends a half an inch each, make sure the elastic is not twisted and then sew them together securely.

Close the gap. Adjust the elastic so it's even. Tack the elastic down at the side seams so it doesn't roll over. Cut any dangly threads anywhere.
You're done! Don't forget to post it in the Flickr group.
Thanks for the great tute! We're not frilly obsessed yet, but we are headed there.
ReplyDeleteI love the swear like a sailor comment. It reminds me of sewing Halloween costumes for my nieces *ages* ago. My husband (boyfriend at the time) thought it was so adorable. Then he heard the swearing about tulle. :)
BTW, I don't know if a ruffler foot would work for this. It works by shoving a little prong into the top layer of fabric as you sew two things together. So 1) I'm not sure how well it works on a single fabric and 2) I think it might shred tulle to ribbons. I'll see if I can grab a little piece of tulle for an experiment and let you know. It would be a waste of money since they aren't cheap.
Brilliant. Thanks for the tutorial. Will be having a go at this sometime soon!
ReplyDeleteEven if I had any good excuse for trying, I would be utterly incapable of doing this. But I'm so impressed that you can, and that your results are so wonderful.
ReplyDeleteThank you for doing all the maths in this tutorial and putting it into a natty coloured table for us. You are, like, 27 different flavours of awesome :)
ReplyDeleteThis pettiskirt is absolutely DARLING! Thanks for sharing this amazing tutorial...I'll be sending my readers your way!
ReplyDeleteThis is so, SO cute!! I need to find a little girl to make this for. What a wonderful idea! I love making costumes, so this is definitely one to file away.
ReplyDeleteIf your interested, check out my sewing blog - I'm about to do my first giveaway, if I can garner enough interest :)
http://rufflesandrosescrafts.blogspot.com/
What a fabulous tutorial! A friend of yours submitted it to my blog - Totally Tutorials . I'll need your permission first before I can post it. Would that be okay?
ReplyDeleteOh my gosh, these are so great, i want to make one for ME ME ME! LOL! Great tutorial, thank U!
ReplyDeleteBy far, the best tutorial on tutu skirt! Thank you!
ReplyDeleteI got this tip for gathering about a month ago and if ever something needed this tip, this project is it. I have a ruffler and have used it often. I have been sewing most of my life and I am 55 and didn't know this trick. Set your stitch length to 3.5 and turn your tension to highest and sew. Voila it ruffles! I just made my granddaughter two skirts and one layer was tulle and it worked beautifully. The only addition to the tip I would make is, break it up if going around a long tube and leave really long thread tails because it usually is a tighter gather than what you will need, so leave plenty of thread to "pull it out" to the width you need. This is soooo simple I don't know why I never knew this. I can't remember where I got the tip to give them credit, but hope this helps.
ReplyDeleteThanks for the great tutorial. I made a red version for my 4 year old's dance recital. My cutting and measuring left what to be desired and the finished result is a little more "Desperately seeking Susan" than tutu but I love it. I will post pics once the recital is past and I have a minute. Cheers!
ReplyDeleteOK, added a picture on Flickr..Thanks again! I got lots of compliments on her costume despite my dangling threads and uneven edges. Of course my daughter also ripped the skirt jumping in a bouncy castle before the dance so there's a gash and an even more hanging hem. Haha.. sewing for kids is so rewarding.
ReplyDeletegreat tutorial! see more on my site! make hair bows, pettiskirts and more!
ReplyDeleteThanks for this great tutorial. Making one right now for my daughter with a huge roll of tulle I've had for years!
ReplyDeleteThanks so much for this great tutorial! I really liked your tips about gathering the skirts, they were really helpful.
ReplyDeleteThank you so much for this very detailed tutorial! I made a three tiered Christmas tutu recently (here: http://modderhood.blogspot.com/2010/11/three-tier-tutu-tutorial-say-that-three.html) but I think I'm going to try this next time. I like the skirt lining. I would have never thought of that. Great job!
ReplyDeleteThanks for this - I've been looking for the perfect tutorial and this is it. I'm not too keen on the girly girly stuff either, so I'm going to make it for my one year old in either dove grey or navy. Hmmmmm, maybes that's just because I want to make one for myself in either dove grey or navy... AAARGH, no, I'm entering mini-me territory!!! Right, off for a stiff drink and a sit down.
ReplyDeletethanks again
Lorna
I have been looking for a tutorial on how to make a tutu for ages - all I've ever seen are ones for pettiskirts, and this tomboyish mama wanted to avoid them. This skirt has perfect proportions but still allows for enough girly-ness that it will make my girl *very* happy! I really, really don't like gathering, but I've been known to sacrifice for the sake of a twirly skirt. Thank you for sharing!!
ReplyDelete(And I LOOOOVE your daughter's sneakers! Can you tell I'm American? :)