


After finding that most children's sheets are either boring or expensive (or both), I started making our own a couple of years ago. Honestly, not hard at all. And you get to use math. I'm going to share how to make fitted sheets, one with elasticated corners and one with an elasticated casing.
Elasticated corner sheets:
- I like these more for the bigger mattress on Jamie's bed. Measure the length, width and height of the mattress.


- Let's get dorky. Add the excess measurements to make the sheet three dimensional and actually fit over the mattress. Take your original dimensions and add two times the height at every corner. For me, that's eight inches. If you are going to double fold a narrow hem, add two times the height plus 1" instead. For Jamie's sheets, I'll need a piece of fabric that is 40" wide by 79" long.


- Now you have to remove the squares of fabric at the corners to make it a box. Take those measurements right back out, only at the corners. This will make the sheet into box, able to fit the original dimensions taken from your mattress.


- From your big piece of fabric (mine is 40" by 79" as mentioned above), cut these squares out at all four corners. This is my fabric on the fold so I can cut two at the same time.


- Match up the two adjacent 8" legs and sew them together right sides facing. Repeat for all four corners.


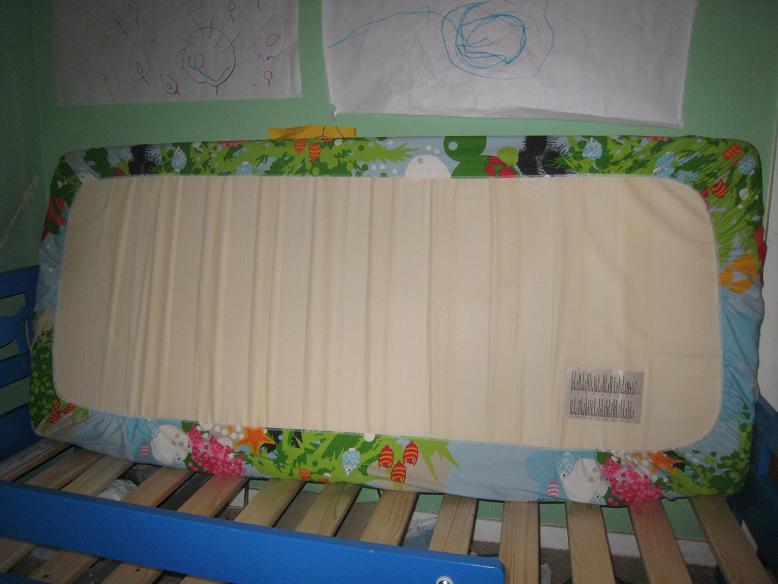
- This is what it looks like from the right side. It's a box!


- Edge finish the entire perimeter. I'm lucky enough to have a serger / overlocker. If you have a regular machine, you could overcast with a zigzag stitch. Or if you have added the extra inch, you could double fold a hem and sew it down.


- I used clear elastic for these sheets because me and my serger are BFF. Cut a 12" piece and pin the centre of the elastic at the corner seam. Measure 11" from the corner and pin the end of the elastic there and repeat for the other side. If you want to use regular 1/4" elastic it's the very same process.


- Drop the needle down into the elastic at the end and pull taut so the elastic is flush against the edge of the fabric. You can't see this very well in the picture because the elastic is, well, clear. While taut, sew the elastic to the fabric. You will probably need to pull the fabric from behind the foot to keep it moving. If you're using regular 1/4" elastic, use a wide zigzag stitch to capture the elastic.


- Repeat for all four corners. Put on on the mattress. As you can see, there is about four inchs to the interior of the mattress.

- You're done!


Fully elasticated casing sheets:
- I like these more for the smaller mattress on Maia's bed. I'm not posting separate pictures for the drafting so have a look above if you need reminded!
- Measure the length, width and height of the mattress as above. The cot mattress dimensions are 24" width by 48" length by 4" height.
- I find it easier if fully elasticated sheets have slightly more excess to the underneath of the mattress so I use two times the height plus 2" (so for this one, 10 inches). Add the excess to each corner. Added to her original mattress, I will therefore need a piece of fabric that measures 44" by 68". And then I will remove 10" squares from each corner.
- Sew the corners as per above.
- Edge finish the perimeter. For lucky ol' me, that means serging. You can also overcast with a zigzag or press under a 1/4".
- Make your casing by folding the perimeter to the inside by an inch and stitching down. If you like, you can iron the crease in first but I found it was easy enough to fold as I was going.


- When you get back to almost where you started, leave a one inch hole open to get the elastic in there.


- Cut a piece of 1/4" elastic that is roughly 65% of the perimeter of the mattress. Maia's crib mattress measures 48" by 24", therefore its perimeter is 144". With a quarter inch elastic that stretchs roughly twice its length, I used a 95" piece. That's plenty tight to keep the sheet on, but not too tight that it's hard to go on.
- Thread it all the way through the casing, and secure the ends together. Sew the one inch hole closed.


- Put on on the mattress. As you can see, there is about five inchs to the interior of the mattress. Optional: if you want the elastic / gathers evenly distributed, adjust while it's on the mattress and then pin the elastic in place at each of the corner seams. Remove from mattress and front and back stitch a couple of times to secure it in place.


- You're done! Round up errant toddlers and make them go to sleep.

These are brilliant - such a clear tutorial, thank you! I've always made do with boring plain fitted sheets but these are fab! Such bright fabrics - seems a shame to cover them with a duvet :o)
ReplyDeleteThey are the coolest sheets I have ever seen. Is there nothing that you can't make?!! They are on my to do list now. Probably get around to it as the kids leave home!
ReplyDeleteThanks for the tutorial.
ReplyDeleteGreetings from Loch Ness
Shippy
Awesome tutorial, thank you :) I now feel a bit more confident in trying to make my own cot sheets...they won't be as funky, but hopefully they'll at least be useable now :D
ReplyDeleteTHANK YOU! I have been wanting to make some, but didn't know how to do the math! -Marci @ Stone Cottage Adventures
ReplyDeleteHi there, thanks so much for excellent tutorial, I made my son a new cot sheet today and I love it! So much better than any for sale, it has toy soldiers on it. Glad I found you! Jen
ReplyDeleteSewing sheets is a nice big project.While you are at it, doing all that sewing, you could replace the elastic with a drawstring. Drawstrings are inherently much more effective than elastic as we see all over the garment world. There is a great design here:
ReplyDeletehttp://www.drawstringsheet.com/
The corners in this design have a big gather panel that extends far beneath the mattress having the effect of the corner band but the drawstring does not give at all so there is no loosening at the corners or anywhere for that matter.
Nicely explained! Very clear and better than other sites that I have looked at. THANKS.
ReplyDeleteI agree with Gabrielle - I looked at some other tuts before this one but they made my head spin - your steps are nice and clear. I made quite a few sheets using your steps, and saved a ton of cash too so I've just added you to my Top 5 baby gear tutorials list.
ReplyDeleteThanks for sharing :)
It's very easy to understand the flat sheets into a elastic corner fitted sheets, nice explanation and easy to understand it. i must try it and if i successful then tell my friends also looks very easy to made it.
ReplyDelete