Showing posts with label Sewing Accessories. Show all posts
Showing posts with label Sewing Accessories. Show all posts
Monday, 24 June 2013
3
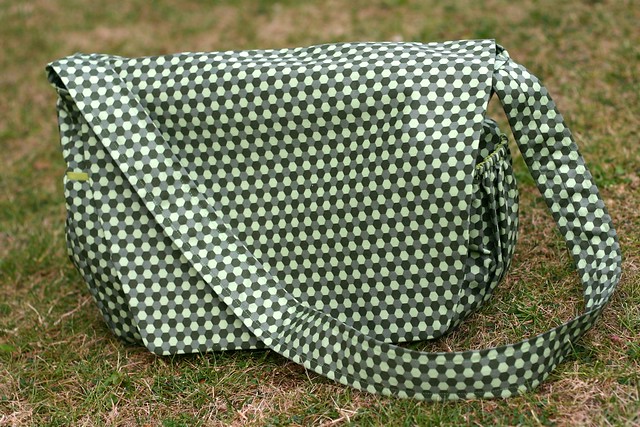
My sister-in-law's sister is (over)due her first baby and I was commissioned to make her a changing bag. I used the same pattern that I drafted for my original Capacious Be-Pocketed Changing Bag, but I made it even more capacious and be-pocketed. Many apologies to Clare, the recipient of bag 1.0. Your bag is still great.
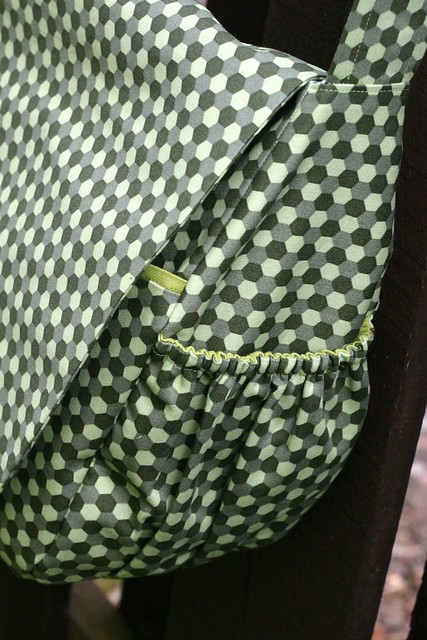
To the side we have two lined pockets that are gathered at the bottom and elasticated at the top, good for holding bottles or wallets snug and accessible. The side panels of version 2.0 are trapezoidal in nature rather than the rectangles of version 1.0- I tapered it to the width of the strap so it would hang better. The strap is cross-body length, made of self-fabric but with a webbing strap inside for stability. Speaking of stability, almost every piece is interfaced and some of the more important pieces are interlined with sturdy canvas as well. I'm lucky that my machine is such a workhorse with all those layers.
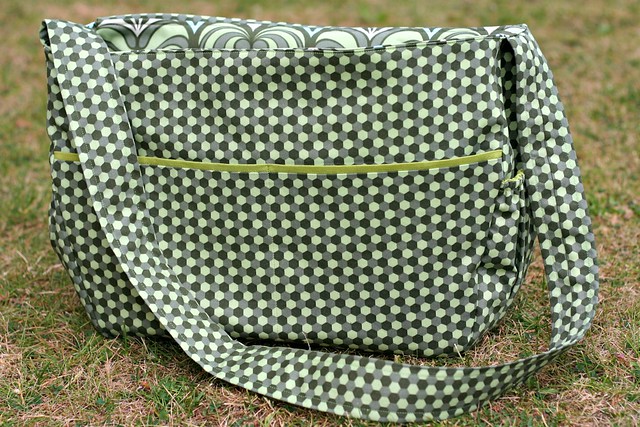
Underneath the messenger flap are two front pockets that are lined with green linen. I made the linen piece slightly taller so that it acts like a faux trim.
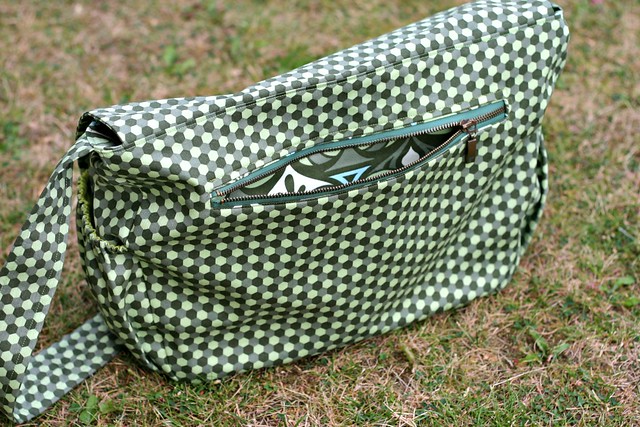
And to the back a large zippered welt pocket. The zipper was thrifted from one of Steven's old sweatshirts as, for reasons I can't explain, I've never bought a metal zip. I must rectify this travesty immediately.
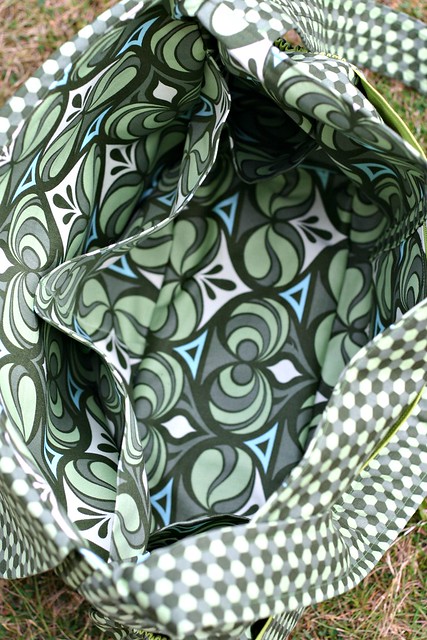
Inside, there are two more full width pockets to the front lining, and two more full width side pockets (this time without elastication). Good for keeping nappy, wipes, phone, keys, etc separate and easily findable.
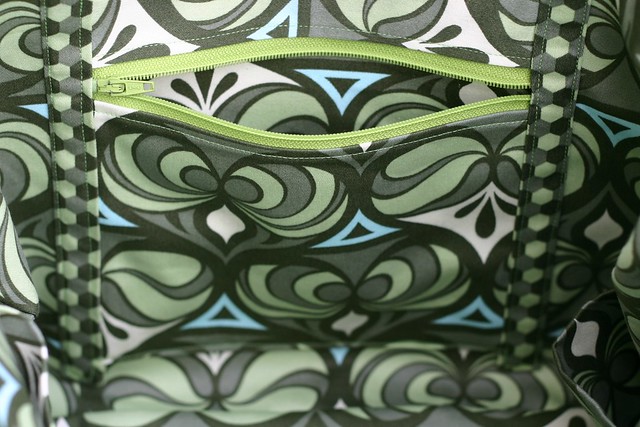
And just for extra snazzy there's an internal zippered patch pocket that I edged with the external fabric. No particular reason for doing it this way except it looks fancy.
Capacious Be-Pocketed Changing Bag: Keep It in the Family Edition
My sister-in-law's sister is (over)due her first baby and I was commissioned to make her a changing bag. I used the same pattern that I drafted for my original Capacious Be-Pocketed Changing Bag, but I made it even more capacious and be-pocketed. Many apologies to Clare, the recipient of bag 1.0. Your bag is still great.
To the side we have two lined pockets that are gathered at the bottom and elasticated at the top, good for holding bottles or wallets snug and accessible. The side panels of version 2.0 are trapezoidal in nature rather than the rectangles of version 1.0- I tapered it to the width of the strap so it would hang better. The strap is cross-body length, made of self-fabric but with a webbing strap inside for stability. Speaking of stability, almost every piece is interfaced and some of the more important pieces are interlined with sturdy canvas as well. I'm lucky that my machine is such a workhorse with all those layers.
Underneath the messenger flap are two front pockets that are lined with green linen. I made the linen piece slightly taller so that it acts like a faux trim.
And to the back a large zippered welt pocket. The zipper was thrifted from one of Steven's old sweatshirts as, for reasons I can't explain, I've never bought a metal zip. I must rectify this travesty immediately.
Inside, there are two more full width pockets to the front lining, and two more full width side pockets (this time without elastication). Good for keeping nappy, wipes, phone, keys, etc separate and easily findable.
And just for extra snazzy there's an internal zippered patch pocket that I edged with the external fabric. No particular reason for doing it this way except it looks fancy.
Wednesday, 5 December 2012
9
Believe it or not, there are occassions when you don't want to dress your iPhone up like a cassette tape or lego-ise it. If it's kicking about in a handbag as dangerous as mine, it's good to protect the screen from knocks and detritus. So how about sewing it a leather cover with a flap? It's a super quick project (I estimate well under an hour) and you can knock them out for all your pals for Christmas. You'll need leather or pleather, some chalk for marking, and a heavy duty / leather needle. You can't pin leather because it leaves a hole, but if you want to you can paper-clip or quilt-clip it to stop shifting, or just hold it with your fingers. When I sew leather, I set my stitch length a bit longer (3 for me) and go s-l-o-w-l-y to make sure you don't skip stitches. Front and back stitch a couple of times at the beginning and end. I use my normal foot, but you can use a teflon or walking foot, or even put some scotch tape underneath the foot to make it slide better. I personally don't find it necessary!
Okay, let's start off by downloading your file. Print it out without scaling and check your measurements. This cover is for a 4s, if you have a different model you might have to adjust the dimensions. It's a good idea to cut the front and back pieces out of paper or card, put your phone in the middle, and pinch round the edges to make sure it fits before you cut your leather. Does it fit?
Okay, let's cut the leather! Front with bit cut out of the top, a back, a flap and a strap.
With a pen or pencil, trace the strap and flap placements firmly onto the paper with the leather below. When you remove the paper, there will be slight indentations on the leather. Transfer these markings with chalk. Alternatively, cut the box and flap markings out of the pattern piece and transfer directly with chalk. You are the master of your own destiny.
All chalked up and ready to sew.
Place the flap onto the back matching the chalk marks. Sew along the top,making sure you catch both layers and that the flap doesn't shift.
When you get to the end, pivot and sew down toward the corner, pivot and sew to the opposite edge, pivot and sew back to where you started. Then you can sew a boxed X through the middle of the rectangle if you like, I personally think it looks better and I am world-renowned for my good taste.
Put the back to the side and get the front and strap out. Strap matches the marking and sew it on close to the edge.
Repeat on the other side.
Place the front and back together wrong sides facing at carefully match up the bottom edge. Out come my paper clips.
Carefully sew along hte bottom close to the edge, catching both layers. I match the inside edge of the oval window of my foot with the edge of the leather, it's scant.
This is what the bottom edge looks like sewn.
At this point I remove the paper-clips as I find they can distort the pieces; if you matched the bottom well the side's should be matching up too. Slowly sew up the right side close to edge, right to the top.
Now, resist the urge real hard to sew the left side from the top to the bottom. You really want to sew it from the bottom to the top as you did the right side, as if you sew one side top to bottom and the other side bottom to top you're risking slippage and distortion. It can make the rectangle a bit more like a rhombus (ask me how I know). So from the bottom to the top, sew the left side close to the edge.
Carefully prise your iPhone out of the mitts of your child, insist that it's yours, slip it into the cover and secure the flap. Now take it to Norway*.
*Do you like how I casually slipped that in? Steven and I are off to Norway tomorrow. Without children!
Tutorial: Sew a leather iPhone cover with flap
Believe it or not, there are occassions when you don't want to dress your iPhone up like a cassette tape or lego-ise it. If it's kicking about in a handbag as dangerous as mine, it's good to protect the screen from knocks and detritus. So how about sewing it a leather cover with a flap? It's a super quick project (I estimate well under an hour) and you can knock them out for all your pals for Christmas. You'll need leather or pleather, some chalk for marking, and a heavy duty / leather needle. You can't pin leather because it leaves a hole, but if you want to you can paper-clip or quilt-clip it to stop shifting, or just hold it with your fingers. When I sew leather, I set my stitch length a bit longer (3 for me) and go s-l-o-w-l-y to make sure you don't skip stitches. Front and back stitch a couple of times at the beginning and end. I use my normal foot, but you can use a teflon or walking foot, or even put some scotch tape underneath the foot to make it slide better. I personally don't find it necessary!
Okay, let's start off by downloading your file. Print it out without scaling and check your measurements. This cover is for a 4s, if you have a different model you might have to adjust the dimensions. It's a good idea to cut the front and back pieces out of paper or card, put your phone in the middle, and pinch round the edges to make sure it fits before you cut your leather. Does it fit?
Okay, let's cut the leather! Front with bit cut out of the top, a back, a flap and a strap.
With a pen or pencil, trace the strap and flap placements firmly onto the paper with the leather below. When you remove the paper, there will be slight indentations on the leather. Transfer these markings with chalk. Alternatively, cut the box and flap markings out of the pattern piece and transfer directly with chalk. You are the master of your own destiny.
All chalked up and ready to sew.
Place the flap onto the back matching the chalk marks. Sew along the top,making sure you catch both layers and that the flap doesn't shift.
When you get to the end, pivot and sew down toward the corner, pivot and sew to the opposite edge, pivot and sew back to where you started. Then you can sew a boxed X through the middle of the rectangle if you like, I personally think it looks better and I am world-renowned for my good taste.
Put the back to the side and get the front and strap out. Strap matches the marking and sew it on close to the edge.
Repeat on the other side.
Place the front and back together wrong sides facing at carefully match up the bottom edge. Out come my paper clips.
Carefully sew along hte bottom close to the edge, catching both layers. I match the inside edge of the oval window of my foot with the edge of the leather, it's scant.
This is what the bottom edge looks like sewn.
At this point I remove the paper-clips as I find they can distort the pieces; if you matched the bottom well the side's should be matching up too. Slowly sew up the right side close to edge, right to the top.
Now, resist the urge real hard to sew the left side from the top to the bottom. You really want to sew it from the bottom to the top as you did the right side, as if you sew one side top to bottom and the other side bottom to top you're risking slippage and distortion. It can make the rectangle a bit more like a rhombus (ask me how I know). So from the bottom to the top, sew the left side close to the edge.
Carefully prise your iPhone out of the mitts of your child, insist that it's yours, slip it into the cover and secure the flap. Now take it to Norway*.
*Do you like how I casually slipped that in? Steven and I are off to Norway tomorrow. Without children!
Labels:
leather craft,
man crafts,
sewing,
Sewing Accessories,
tutorials
Tuesday, 28 August 2012
11
There were joint-birthday celebrations for me and Friend Sarah this weekend. Having previously regaled her with everything in my sewing arsenal (a makeup bag, a smaller makeup bag, a phone cozy, a Kindle cover, a shirt, a glasses case) I was flummoxed with what to make her. And then I remembered: about six months ago she looked at a leather clutch in a shop for at least fifteen seconds. She probably wanted one. A plan was hatched.
Looking through my Pinterest boards, I was immediately drawn to this scalloped leather clutch by Me Sew Crazy. But with entirely different dimensions, the addition of a zipper and lining, snazzy contrast stitching and precisely zero hand sewing. And by snazzy, I mean questionable.
Because Sarah is very special, she was allowed to have some of my precious Liberty leather. Because she is also very gracious and tactful, she said she would use it for a wedding this weekend. I will have to follow her secretly to find out.
In other birthday girl news, after only 32 months of pining, my in-laws made my life complete.
The Best Kind of Scallops Leather Clutch
There were joint-birthday celebrations for me and Friend Sarah this weekend. Having previously regaled her with everything in my sewing arsenal (a makeup bag, a smaller makeup bag, a phone cozy, a Kindle cover, a shirt, a glasses case) I was flummoxed with what to make her. And then I remembered: about six months ago she looked at a leather clutch in a shop for at least fifteen seconds. She probably wanted one. A plan was hatched.
Looking through my Pinterest boards, I was immediately drawn to this scalloped leather clutch by Me Sew Crazy. But with entirely different dimensions, the addition of a zipper and lining, snazzy contrast stitching and precisely zero hand sewing. And by snazzy, I mean questionable.
Because Sarah is very special, she was allowed to have some of my precious Liberty leather. Because she is also very gracious and tactful, she said she would use it for a wedding this weekend. I will have to follow her secretly to find out.
In other birthday girl news, after only 32 months of pining, my in-laws made my life complete.
Stunning, flawless, flattering.
Labels:
Friend Sarah,
leather craft,
sewing,
Sewing Accessories
Saturday, 28 January 2012
16
If this was my handbag I'd fill it with All the Things
When we visited my folks last summer and I forgot to pack my handbag, my mum let borrow her all-time-favourite bag. She didn't use it anymore because she thought it was passed its best; I have lower standards so have been using it ever since. In exchange for borrowing her bag (and taking it back to Scotland with me), I agreed to make her an even better one.
I belong to the school of thought that you can measure the relative awesomeness of a bag by the number of pockets / compartments, with bonus points for extra zippers. This bag?
One deep zippered back pocket that goes all the way down to the base.......
One deep zippered front pocket that goes all the way down to the base.......
A front pouch pocket with a boxy three-dimensional base and magnetic closure*. Inside this pocket is a two-section patch pocket with two pen holders.
Elasticated pockets inserted into each of the side seams for phones and keys...
A recessed zipper to the top. Speaking of which, here's some advice from me: do not decide to figure out how to insert a recessed zipper when the bag is 90% finished. It's too late by then. I ended up chopping around the whole bag, sandwiched the zipper panel in between, and then sewed it back together. I was a nervous wreck.
And to the inside a cavernous section and four side pockets. Bringing us up to a grand total of 14 separate compartments in which to stash your stuff.
And here my mum is holding it**. See how the adjustable strap allows her to carry it on her shoulder (as she likes to do)? It also allows you to carry it cross-body (as I like to do). Which will be handy when I steal it back next summer.
*The original bag had a flap with velcro. How dumb is that? The answer is heaps. It alternated between laddering my tights and snagging on my sweater sleeves and gloves.
** And a Spongebob inflatable. I can't explain this.
*The original bag had a flap with velcro. How dumb is that? The answer is heaps. It alternated between laddering my tights and snagging on my sweater sleeves and gloves.
** And a Spongebob inflatable. I can't explain this.
Tuesday, 17 January 2012
3
Rather than drag a stack of near-empty cases back and forth to the States with us, I made Jamie an early Christmas present of a nifty DS carrier. The red fabric contains a thick rigid board inside of it with a pocket to each side using a French terry with a huge amount of Lycra (and therefore good stretch recovery). One pocket for slipping the DS inside, the other pocket...
Has a hard-back book with slots for individual games, with a ribbon tab for ease of pulling it out of the pocket. If I was to do it again (and I will at some point as Maia got a DS for Christmas too), I'm going to attempt to figure out how to add a zipper around the book for extra security lest a game fall out when the carrier is knocking about every-which-way in their backpacks.
In other news, Long-term Top Secretness is being revealed within the week. I'm very nervous.
The Itinerant Gamer
Can I just state for the record that within four hours of Laura saying 'OMG how do you keep you nails so long?!' three quarters of them broke and the rest needed to be cut to match? She is clearly a voodoo practitioner.
Rather than drag a stack of near-empty cases back and forth to the States with us, I made Jamie an early Christmas present of a nifty DS carrier. The red fabric contains a thick rigid board inside of it with a pocket to each side using a French terry with a huge amount of Lycra (and therefore good stretch recovery). One pocket for slipping the DS inside, the other pocket...
Has a hard-back book with slots for individual games, with a ribbon tab for ease of pulling it out of the pocket. If I was to do it again (and I will at some point as Maia got a DS for Christmas too), I'm going to attempt to figure out how to add a zipper around the book for extra security lest a game fall out when the carrier is knocking about every-which-way in their backpacks.
In other news, Long-term Top Secretness is being revealed within the week. I'm very nervous.
Friday, 13 January 2012
0
It required the full gamut of my leather stash (grey, maroon, blue, cherry red, and olive green) to make eyeglasses cases for my bespectacled friends and family.
Leather is interesting* to sew with because the texture, thickness and stiffness varies so much between hides.
The grey, for example, is very sueded and supple. The blue, however, is very thick and not very pliable.
By the way, if that post title doesn't entitle me to automatic band membership to Artic Monkeys, I don't know what will*.
*Interesting to me.
**Spectacle receptacle? Optical synoptical?
Myopia Cornucopia
It required the full gamut of my leather stash (grey, maroon, blue, cherry red, and olive green) to make eyeglasses cases for my bespectacled friends and family.
Leather is interesting* to sew with because the texture, thickness and stiffness varies so much between hides.
The grey, for example, is very sueded and supple. The blue, however, is very thick and not very pliable.
By the way, if that post title doesn't entitle me to automatic band membership to Artic Monkeys, I don't know what will*.
*Interesting to me.
**Spectacle receptacle? Optical synoptical?
Labels:
christmas,
leather craft,
sewing,
Sewing Accessories
Wednesday, 30 November 2011
1
Whenever I get an email asking if I can make something bespoke for someone, I always ask to hear a bit more about the recipient... what colours they like, what styles or themes they're keen on, if there's anything they're passionate about. This Kindle case was for the customer's mum.
I was not expecting to hear that she was into 'shoes, tattoos and skulls'. Coolest grandma ever.*
*Excluding any grandma whose uterus I have gestated within of course. Automatically cooler.
Kindle Covers for Generation Awesome
Whenever I get an email asking if I can make something bespoke for someone, I always ask to hear a bit more about the recipient... what colours they like, what styles or themes they're keen on, if there's anything they're passionate about. This Kindle case was for the customer's mum.
I was not expecting to hear that she was into 'shoes, tattoos and skulls'. Coolest grandma ever.*
*Excluding any grandma whose uterus I have gestated within of course. Automatically cooler.
Monday, 21 November 2011
2
It appears to be The Age of The Kindle. After the leather lovelies of last week, I returned to the book-style covers of yore with a commission for two organic cotton ones. As always, they have super thick board on both sides and a spine so the Kindle is protected from stabbing from almost all sides.
Unfortunately, I couldn't find my pattern so I had to re-draft the whole thing. While I was there, I added a pocket on the other size for sundries.
The recipient of this case hs an old-style keyboard model like me, so the cut out is to the right where the on/off switch and the charger port are.
The recipient of the Monaluna Double Dots has a new-style Kindle so her pocket is to the centre where that version's charger port is. As this model is sans keypad, and has less height overall, I also shortened the pocket so it doesn't interfere with the screen.
Amazon, stop changing all the specs unless you're going to send me one of each.
Kindles Go Organic
It appears to be The Age of The Kindle. After the leather lovelies of last week, I returned to the book-style covers of yore with a commission for two organic cotton ones. As always, they have super thick board on both sides and a spine so the Kindle is protected from stabbing from almost all sides.
Unfortunately, I couldn't find my pattern so I had to re-draft the whole thing. While I was there, I added a pocket on the other size for sundries.
Pictured: sundries
The recipient of this case hs an old-style keyboard model like me, so the cut out is to the right where the on/off switch and the charger port are.
The recipient of the Monaluna Double Dots has a new-style Kindle so her pocket is to the centre where that version's charger port is. As this model is sans keypad, and has less height overall, I also shortened the pocket so it doesn't interfere with the screen.
Amazon, stop changing all the specs unless you're going to send me one of each.
Friday, 11 November 2011
1
I've been a busy bee making some more Kindle Cases with my leather stash. Some of you asked on my last post where I got my leather from. In the case of the blue: Ebay. But these two?
Hoo boy.... I was very lucky (my bank manager would disagree with the use of 'lucky') that I happened across these two hides in my local fabric shop . They are the most beautiful soft and supple Italian leather, originally intended for Liberty London. Honestly, they feel so nice thatI'd you'd be tempted to cut it apart and rub it all over my your body. Warning: Please match up the striked pronouns, and then match up the non-strike pronouns. I don't want to rub the leather on your body. Much.
The interior has just been left natural suede because a) classy b) soft.
The dark brown is very nice too, and Steven is still weighing up whether he'd like to switch to this more subtle cover than his bright blue one.
Speaking of Steven's cover, I've also tried mixing it up with a constrasting closure. Does it work? I think I like it. This leather is thicker than the Liberty ones and therefore a bit more protective for people who don't hold their Kindles close to their heart as I do.
To answer more questions from last post, no, you don't need a super snazzy powerful machine to sew leather. You do, however, need to have heavy duty needles (I use leather needles) to punch through and they dull so fast. Get heaps, and change them regularly. You also need patience to go slowly and clips in lieu of needles. Once there is a hole in leather, it's there forevermore. Practice on scraps with tension, stitch length and foot pressure.
If you're interested, they are all in my shop :)
Kindle Covers: Now 300% posher
I've been a busy bee making some more Kindle Cases with my leather stash. Some of you asked on my last post where I got my leather from. In the case of the blue: Ebay. But these two?
Hoo boy.... I was very lucky (my bank manager would disagree with the use of 'lucky') that I happened across these two hides in my local fabric shop . They are the most beautiful soft and supple Italian leather, originally intended for Liberty London. Honestly, they feel so nice that
The interior has just been left natural suede because a) classy b) soft.
The dark brown is very nice too, and Steven is still weighing up whether he'd like to switch to this more subtle cover than his bright blue one.
Speaking of Steven's cover, I've also tried mixing it up with a constrasting closure. Does it work? I think I like it. This leather is thicker than the Liberty ones and therefore a bit more protective for people who don't hold their Kindles close to their heart as I do.
To answer more questions from last post, no, you don't need a super snazzy powerful machine to sew leather. You do, however, need to have heavy duty needles (I use leather needles) to punch through and they dull so fast. Get heaps, and change them regularly. You also need patience to go slowly and clips in lieu of needles. Once there is a hole in leather, it's there forevermore. Practice on scraps with tension, stitch length and foot pressure.
If you're interested, they are all in my shop :)
Labels:
geek crafts,
leather craft,
sewing,
Sewing Accessories
Subscribe to:
Posts (Atom)


