Showing posts with label costumes. Show all posts
Showing posts with label costumes. Show all posts
Thursday, 15 May 2014
15
It was the girl's birthday yesterday, can you guess how old she is (clue above)? How times flies / I can't believe it / where's my baby ad infinitum.
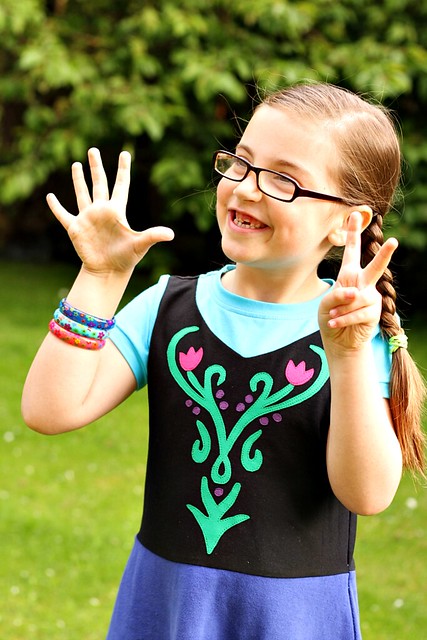
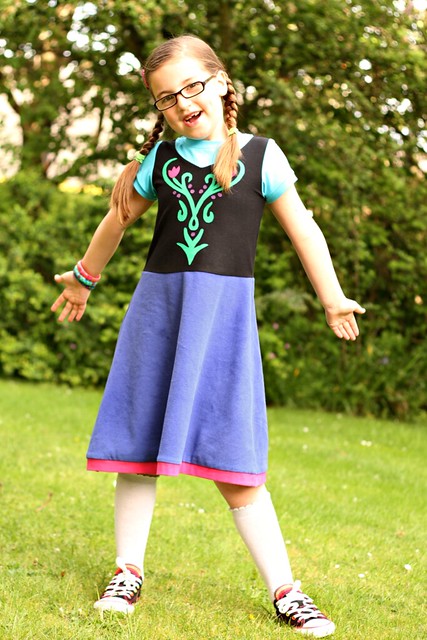
She's been bitten by the ubiquitous Frozen bug so I wanted to make her an Anna dress. She probably would've broken her No Wovens rule for a more accurate replica, but I wanted to make one that wasn't too costumey, and fit in with her everyday play-friendly wardrobe.
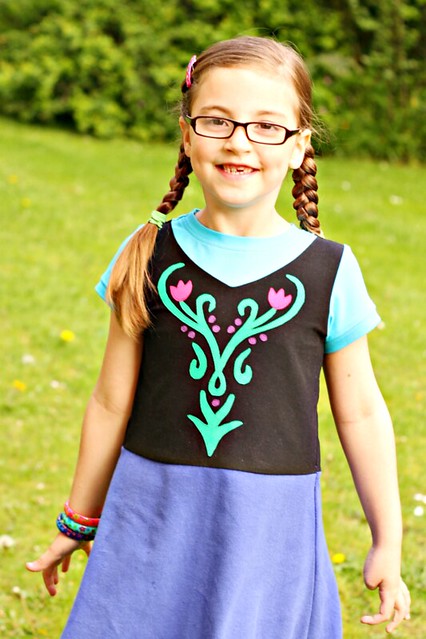
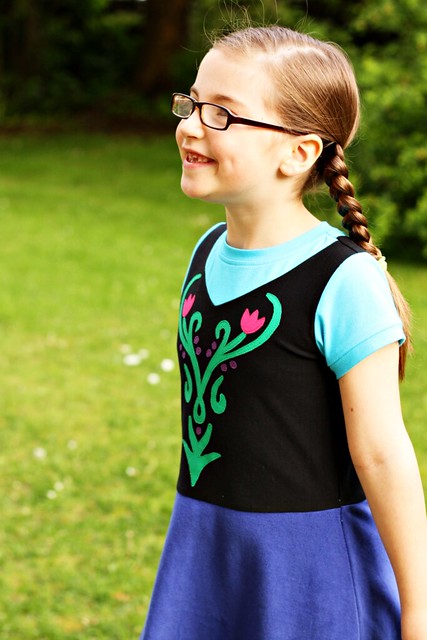
As you can probably tell from the silhouette (and my previous form for hacking my patterns rather than starting from scratch), I used my skater pattern as a starting point.
I raised the neck and then split it so it looks like there's an undershirt with a pinafore over the top- not so, it's a single bodice!
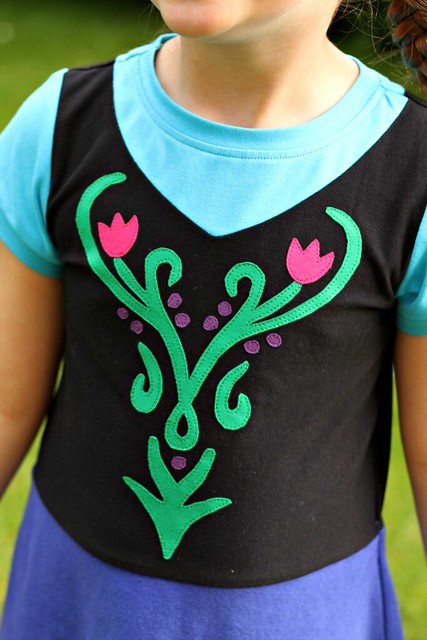
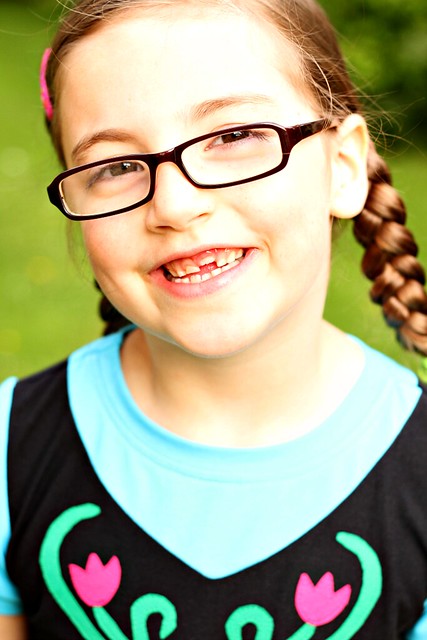
I found some templates for the bodice design and combined, resketched, and scaled it so it would be a good fit. Then I ironed Heat n' Bond onto different coloured jerseys, cut them out, positioned and ironed them into place, and then stitched them on. Much easier (for me) than stencilling, and provides a nice texture.
Rather than appliqué the skirt in the same manner, I added a band of fuchsia at the bottom instead of a hem so it ties in with the overall colour scheme and adds a bit of length. The overall effect is 'Come at me, yo'.
I'm so, so grateful for this little big girl in my life. She so gracious and enthusiastic it's an absolute joy to make her happy.
Frozen Goes Casual: The Anna Skater
It was the girl's birthday yesterday, can you guess how old she is (clue above)? How times flies / I can't believe it / where's my baby ad infinitum.
She's been bitten by the ubiquitous Frozen bug so I wanted to make her an Anna dress. She probably would've broken her No Wovens rule for a more accurate replica, but I wanted to make one that wasn't too costumey, and fit in with her everyday play-friendly wardrobe.
As you can probably tell from the silhouette (and my previous form for hacking my patterns rather than starting from scratch), I used my skater pattern as a starting point.
I raised the neck and then split it so it looks like there's an undershirt with a pinafore over the top- not so, it's a single bodice!
I found some templates for the bodice design and combined, resketched, and scaled it so it would be a good fit. Then I ironed Heat n' Bond onto different coloured jerseys, cut them out, positioned and ironed them into place, and then stitched them on. Much easier (for me) than stencilling, and provides a nice texture.
Rather than appliqué the skirt in the same manner, I added a band of fuchsia at the bottom instead of a hem so it ties in with the overall colour scheme and adds a bit of length. The overall effect is 'Come at me, yo'.
I'm so, so grateful for this little big girl in my life. She so gracious and enthusiastic it's an absolute joy to make her happy.
Monday, 4 November 2013
7
My brief for this Halloween was a cat costume so that Maia could play the black cat familiar to her witchy best friend. I nearly Bimaaed a cat hoodie to wear with black leggings until I discovered a large piece of black polar fleece on the top shelf (and being that my years-old fleece stash is the stash I'm keenest to bash) and decided to make a cat onesie instead.
It's got a double layer fleece hood with a drawstring to hug the face should one desire (hugging this face is frankly irresistible) and I split the hood in such a way that I could insert big ol' ears in the seam.
It's got a long front zip, drop crotch (ugh to that term), and slouchy legs so she can wear it comfortably for a good couple of years. Onesies are for life, not just for Halloween.
I forgot to put a tail in the back seam but, as you can see, it in no way hinders her ability to strut around like a gd Cat Boss.
The Cat's Pajamas
My brief for this Halloween was a cat costume so that Maia could play the black cat familiar to her witchy best friend. I nearly Bimaaed a cat hoodie to wear with black leggings until I discovered a large piece of black polar fleece on the top shelf (and being that my years-old fleece stash is the stash I'm keenest to bash) and decided to make a cat onesie instead.
It's got a double layer fleece hood with a drawstring to hug the face should one desire (hugging this face is frankly irresistible) and I split the hood in such a way that I could insert big ol' ears in the seam.
It's got a long front zip, drop crotch (ugh to that term), and slouchy legs so she can wear it comfortably for a good couple of years. Onesies are for life, not just for Halloween.
I forgot to put a tail in the back seam but, as you can see, it in no way hinders her ability to strut around like a gd Cat Boss.
Wednesday, 25 September 2013
8
Handmade Costume Series: Minecraft Jamie
Inevitably, it's that time of the year where we're starting to think about our Halloween costumes. Technically speaking I would've commenced the actual costume-labour the day before Halloween much closer to the end of October but I'm up on The Train To Crazy's Handmade Costume Series today!
Despite applying extreme pressure on the kids to chose a Doctor Who theme for which I could sew (I will never forgive Maia for turning down the Sister of Plenitude Cat Nurse), they had their hearts set on Minecraft Costumes. If you don't have children or know children, you might be unfamiliar with Minecraft and I am currently jealous of you. Jamie is obsessed, all of his friends are obsessed, Maia is working on it.
I couldn't find any conceivable way that I'd be able to utilise an actual skill of mine like sewing, so I was forced to deploy other crafting techniques (I hesitate to call them skills) of painting and 3-D construction. The good news is that Minecraft is a 16 bit game designed to look heavily pixelated with all straight edges so it was fairly straightforward to replicate.
What you need (a lot of these are do as I say, not as I do):
I wanted to concentrate most of my efforts on the front view so I Google image-searched and used this larger file for the basis of just the face. I blew it up and printed it on glossy paper so I'd have a big visual reference and also somewhere to get the shades correct before committing it to paper. Counting the pixels the face is 8x8 so I decided to use a 1.5" grid to yield a 12"x12" box. Using a ruler I made the grid on my paper five times (front face, side left, side right, back head, and top head). What I didn't do (but wish I had) was to add a margin of half an inch around all edges of the grid so it would be easier to wrap continuously around the box.
I started with a colour I already had and tested it right on the photo to make sure there was a colour-match before committing it to the grid.
Once I'd exhausted the straight matches, I started mixing colours together on a palette to form the rest. If you're attempting your own Minecraft Steve and following my advice to add margins along the edges, extend the paint on the border cells that extra half inch.
Keep on mixing paints and in four short hours, you'll have something like this (but with borders, because you're cleverer than me). After the front was down it's time to do the remaining four sides, which thankfully are a lot less work. I'd tracked down a different file for the remaining panels, printed that out on a much smaller scale and set to work on painting the rest.
After all the panels are complete, leave the paint to dry (or stay up all night depending on your time-scale). Once dry, cut five 12"x12" pieces of board and them together at the edges like so:
Then fold the panels in to form a cube. Use your adhesive of choice to attach the painted panels to the corresponding sides of the cube (told you those borders would come in handy). And you're done! Find an addict and make him stand in the garden at dawn for reasons-confusing-to-the-neighbours.
Make it up to him by superimposing his Minecraft avatar into a screenshot of one of his very own servers. Before you ask, nope, I haven't dealt with the eye holes yet. This box is going to go on top of a body box closer to Halloween so I need to wait to see at what level his eyes are sitting at.
Thanks for having me, Andrea, and make sure you check out the rest of the series!
Despite applying extreme pressure on the kids to chose a Doctor Who theme for which I could sew (I will never forgive Maia for turning down the Sister of Plenitude Cat Nurse), they had their hearts set on Minecraft Costumes. If you don't have children or know children, you might be unfamiliar with Minecraft and I am currently jealous of you. Jamie is obsessed, all of his friends are obsessed, Maia is working on it.
I couldn't find any conceivable way that I'd be able to utilise an actual skill of mine like sewing, so I was forced to deploy other crafting techniques (I hesitate to call them skills) of painting and 3-D construction. The good news is that Minecraft is a 16 bit game designed to look heavily pixelated with all straight edges so it was fairly straightforward to replicate.
What you need (a lot of these are do as I say, not as I do):
- White heavy paper (I used normal printer-weight and would definitely recommend something heavier so it doesn't wrinkle from the paint)
- Cardboard to make the box (I salvaged corrugated cardboard as that's what I had to hand but I would definitely recommend choosing something with a smoother surface)
- Paint (I used brown, black, white, red, peach, and yellow acrylics)
- Ruler and pencil
- Adhesive to fix your paper to your cardboard
- Tape to form your box
I wanted to concentrate most of my efforts on the front view so I Google image-searched and used this larger file for the basis of just the face. I blew it up and printed it on glossy paper so I'd have a big visual reference and also somewhere to get the shades correct before committing it to paper. Counting the pixels the face is 8x8 so I decided to use a 1.5" grid to yield a 12"x12" box. Using a ruler I made the grid on my paper five times (front face, side left, side right, back head, and top head). What I didn't do (but wish I had) was to add a margin of half an inch around all edges of the grid so it would be easier to wrap continuously around the box.
I started with a colour I already had and tested it right on the photo to make sure there was a colour-match before committing it to the grid.
Once I'd exhausted the straight matches, I started mixing colours together on a palette to form the rest. If you're attempting your own Minecraft Steve and following my advice to add margins along the edges, extend the paint on the border cells that extra half inch.
Keep on mixing paints and in four short hours, you'll have something like this (but with borders, because you're cleverer than me). After the front was down it's time to do the remaining four sides, which thankfully are a lot less work. I'd tracked down a different file for the remaining panels, printed that out on a much smaller scale and set to work on painting the rest.
After all the panels are complete, leave the paint to dry (or stay up all night depending on your time-scale). Once dry, cut five 12"x12" pieces of board and them together at the edges like so:
Then fold the panels in to form a cube. Use your adhesive of choice to attach the painted panels to the corresponding sides of the cube (told you those borders would come in handy). And you're done! Find an addict and make him stand in the garden at dawn for reasons-confusing-to-the-neighbours.
Make it up to him by superimposing his Minecraft avatar into a screenshot of one of his very own servers. Before you ask, nope, I haven't dealt with the eye holes yet. This box is going to go on top of a body box closer to Halloween so I need to wait to see at what level his eyes are sitting at.
Thanks for having me, Andrea, and make sure you check out the rest of the series!
Monday, 31 October 2011
4
Seeing as I started with a Viking Hat for The Train to Crazy's Handmade Dress Up Series, I thought I'd finish with two full blown Viking costumes for Halloween.
We had two parties over the weekend, a nursery party this morning, and we're out guising tonight so at least they're getting heaps of wear for the million hours I spent on them. I've taken more than two hundred pictures so far and haven't been able to catch a single full length picture where they are both in focus and looking normal.
A brown jersey tunic for the boy, a red velveteen tunic for the girl, four faux fur legwarmers, four faux fur arm warmers, two faux fur capelets, ten faux suede ties, and two padded and stuffed hats. By my calculations, that's about ten different hateful fabrics. And I have a (probably fatal) lung condition from all the faux fur I inhaled.
The Nordic talismans on the capelets were purchased from a shaman on Ebay. No joke.
See how they strut the streets of Edinburgh like a boss. But wait... isn't something missing?
My screwed up Freudian Viking Projection Fantasy is complete.
The Viking Raid
Seeing as I started with a Viking Hat for The Train to Crazy's Handmade Dress Up Series, I thought I'd finish with two full blown Viking costumes for Halloween.
We had two parties over the weekend, a nursery party this morning, and we're out guising tonight so at least they're getting heaps of wear for the million hours I spent on them. I've taken more than two hundred pictures so far and haven't been able to catch a single full length picture where they are both in focus and looking normal.
A brown jersey tunic for the boy, a red velveteen tunic for the girl, four faux fur legwarmers, four faux fur arm warmers, two faux fur capelets, ten faux suede ties, and two padded and stuffed hats. By my calculations, that's about ten different hateful fabrics. And I have a (probably fatal) lung condition from all the faux fur I inhaled.
The Nordic talismans on the capelets were purchased from a shaman on Ebay. No joke.
See how they strut the streets of Edinburgh like a boss. But wait... isn't something missing?
My screwed up Freudian Viking Projection Fantasy is complete.
Sunday, 31 October 2010
8
I'm afraid I will not be surprising you with the second of my Halloween costumes. Unless you're surprised by extreme camp-ness, in which case you'll be shocked.
There is not a child on this Earth that was more pleased with his costume. He lent it more gravitas than it deserved.

Second verse, same as the first, but a little bit camper and a little bit worse.
I'm afraid I will not be surprising you with the second of my Halloween costumes. Unless you're surprised by extreme camp-ness, in which case you'll be shocked.
There is not a child on this Earth that was more pleased with his costume. He lent it more gravitas than it deserved.
Being a Superhero is some serious business.
The kids both wore their costumes to soft play this morning and I have it on good authority that their costumes inspired awe and friendship.
I know you've seen enough pictures of Maia rocking her costume to last you a lifetime, but I defy you not to LOL at this. The brief was 'look tough'.
It kills me. But not as much as this one.
Just. Look. At. That. Sassy. Pose.
/bookmark for teenage years.
Friday, 29 October 2010
19
Although technically I should have had an additional two sleeps to complete Halloween costumes, Maia's nursery party was this morning so I had to rush, rush, rush to get this done. Did I mention that the silver foil lycra only arrived yesterday afternoon? Before you scroll down, take a moment to appreciate the majesty of the Buddha belly.
If Satan ran a haberdashery shop, all of these fabrics would be on special offer because not even the Devil himself would like to sew with them. The silver foil was at least sturdy, but it came wrapped with paper between every fold because it sticks to itself, and pins leave permanent puncture marks.
The pink silk touch lycra feels beautiful and has such a lovely drape but is so slinky and stretchy it's less stable than my mental health. And that's saying something.
The mask is backed with felt, stitched close to the edge and trimmed. There was nothing else I could do with that pesky lycra.
The 'M' to the chest it's tightly zig-zagged with lime green stitchingbecause I didn't have any pink thread for extra pop.
She was ten times ecstatic to be wearing it on the school run and told countless random people variations of 'I am Super Maia. I am here to save the day. I have so much work to do. There's somebody in trouble.' And our childminder almost died laughing at her 'toddler fetish wear'. My work here is done.
Super Maia, Scourge of the Universe
Although technically I should have had an additional two sleeps to complete Halloween costumes, Maia's nursery party was this morning so I had to rush, rush, rush to get this done. Did I mention that the silver foil lycra only arrived yesterday afternoon? Before you scroll down, take a moment to appreciate the majesty of the Buddha belly.
If Satan ran a haberdashery shop, all of these fabrics would be on special offer because not even the Devil himself would like to sew with them. The silver foil was at least sturdy, but it came wrapped with paper between every fold because it sticks to itself, and pins leave permanent puncture marks.
The pink silk touch lycra feels beautiful and has such a lovely drape but is so slinky and stretchy it's less stable than my mental health. And that's saying something.
The mask is backed with felt, stitched close to the edge and trimmed. There was nothing else I could do with that pesky lycra.
The 'M' to the chest it's tightly zig-zagged with lime green stitching
She was ten times ecstatic to be wearing it on the school run and told countless random people variations of 'I am Super Maia. I am here to save the day. I have so much work to do. There's somebody in trouble.' And our childminder almost died laughing at her 'toddler fetish wear'. My work here is done.
Monday, 4 October 2010
16
How do you out-awesome a skeleton?
Despite it being only the beginning of October, the crafty bloggy world is already a-twitter about Halloween. It's like the biggest event in the crafting calendar. I'm not much of a forward planner when it comes to sewing things for my own family, but Halloween costume fabric requirements would normally fall outwith the stash. Unless I make them go as Michael Miller and Amy Butler. Which, yes, would be funny. But only in limited circles. So I'll definitely need to buy some specialist fabric. But what to make? Don't tell me to ask them. I'm too much of control freak to spend my time sewing something atrocious and I'm 98% certain that Maia would request a Princess Ballerina. And Jamie a Care Bear. I'm not going to have that on my conscience.
A reminder of the costumes I made them last year:

If you want, I'm happy to discuss how much they've grown in a year. Before you ask, I don't know why Maia has turbo powered hair follicles. I suspect it's to torment me.
So, crafty peeps: what costumes are you making for the kids this year? Non-masochistic folk: what costumes are you buying?
A reminder of the costumes I made them last year:

If you want, I'm happy to discuss how much they've grown in a year. Before you ask, I don't know why Maia has turbo powered hair follicles. I suspect it's to torment me.
So, crafty peeps: what costumes are you making for the kids this year? Non-masochistic folk: what costumes are you buying?
Saturday, 31 October 2009
15

These are the costumes that I've been slogging over for at least eleven years. Or maybe the last two days. It felt like eleven years though due to the amount of bleach fumes I've inhaled.

I wasn't organised enough to buy blanks to embellish, so I made the tops and leggings from stratch as well. And I had to draft the patterns. So it really was close to eleven years work.

And to add to my workload, I did the backs too.

I started the project chalking the outlines on the fabric before attacking them with the bleach, but then I got sobored skilled I just freestyled them. I should probably get an honorary medical degree based on my knowledge of anatomy.

If anyone else is wanting to get in on this bleaching action (and you should because it's fun), make sure you get brushes with synthetic bristles. The bleach ate through an entire pack my natural hair brushes!
Halloween non-humiliation

These are the costumes that I've been slogging over for at least eleven years. Or maybe the last two days. It felt like eleven years though due to the amount of bleach fumes I've inhaled.

I wasn't organised enough to buy blanks to embellish, so I made the tops and leggings from stratch as well. And I had to draft the patterns. So it really was close to eleven years work.

And to add to my workload, I did the backs too.

I started the project chalking the outlines on the fabric before attacking them with the bleach, but then I got so

If anyone else is wanting to get in on this bleaching action (and you should because it's fun), make sure you get brushes with synthetic bristles. The bleach ate through an entire pack my natural hair brushes!
Subscribe to:
Posts (Atom)


