Showing posts with label sewing book squee. Show all posts

Saturday, 5 March 2011

34

Tutorial: How to fully line a bodice


A couple of days ago, I clicked through to a tutorial about all-in-one facings on Crafterhours. Although I knew how I line a bodice, I'm always interested in how other people do things. And it turns out we do it differently! After a very pleasant exchange of emails and ideas, I was encouraged to share my way of doing it so here we go...

By fully lining a bodice, not only is it a neater finish and a way of hiding your seams but it's possible to encorporate it a fully reversible dress. Personally, I find it quicker than facings or bindings. This method of works if your back piece has a centre seam that makes it two pieces (so you can put in a zipper or a slit or a button placket). If you have a single front and back piece, this is not the way for you...
  • You will have a front bodice and two back bodice pieces, and identical pieces cut out of your lining. Sew the shoulder seams like so:
  • Repeat for lining pieces.
  • Right sides facing, place the shell bodice on top of the lining bodice, match up all the edges and pin in place.
  • Sew them together along the neck curve and armhole curve. In this picture, I am making a slit with a button so I've also sewn partially down the centre back seam. Don't do this if you're not making a slit!
  • Clip into the seam allowances around the neck and arm curves so they can be pressed flatter.
  • Push each side of the bodice right side out through the front bottom hole. Manipulate with your fingers so all seams lie flat and corners are sharp. Press into position with the iron.
  • Bring one of your back pieces down onto the front piece, matching up the four raw edges from the armpit down to where the bodice ends. It should be a sandwich of shell, lining, lining, shell. Right sides facing, pinch the two bottom corners of lining together, leaving the two shell pieces hanging loose (I've flipped a shell piece up so you can see better).
  • Pull the shell corners up (rigth sides facing) and pin along both raw edges, up and over the seam line where the fabric changes (pic on right below). Right sides facing, you have now pinned together lining to lining, shell to shell.
  • Stitch along this edge. While you are stitching, pull and manipulate the fabric so it is a straight line. Clip into seam allowance where the two fabrics meet, and then flip it open again and your side seam is created. Press in place.
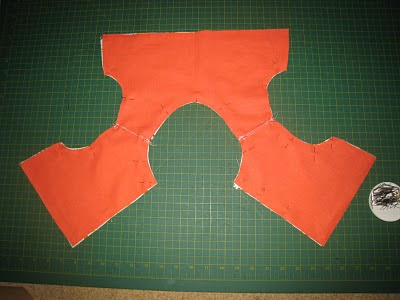
  • Repeat this process for the other side seams of the bodice, and you will have this:
  • If you're doing a slit and button closure (as I am in these pictures), repeat the same process as you did to the side seams to the centre back seam.
You're done! Now you have a nice and neat fully lined bodice.

Thursday, 29 July 2010

5

Macaron madness. No, seriously. Madness.

I diligently worked on my Macaron bodice muslin last night. I'm not so hot at making 'muslins'. The closest I can come is to use fabric I don't OMG love but won't mind losing from my stash if it's a wadder. But I'm always thinking 'This one's going to work out so I should use normal fabric!' You know, because someone sedated me when I wasn't paying attention and performed extensive plastic surgery so my body is likely to fit into anything without a bajillion adjustments.

So here's the muslin sewn up exactly as I was told to do.

You know what? This picture doesn't actually make it look too bad. The reality is, if I was to say it made me look like a brick sh*thouse, that'd be unfair to brick sh*thouses. A huge pool of excess fabric under the bust, major arm gappage and a waistband that didn't hit at the smallest point. I went to bed (though not to sleep), in a major funk.

I wondered this morning if I could use any of the insight from Fit For Real People to try to salvage the bodice. First, I tried to address the arm gap. My doppelganger is wearing my bra, so I could feel that the curvy spotty piece was falling well below my cup line. This doesn't surprise me because I have a freakishly short torso and my breasts pretty much start at my collar-bones. By making a horizontal half inch tuck all the way across the upper chest, I lifted not only the spotty bit, but also the waistband, and it addressed some of the gap at the armhole. But not all of it, I also had to shave the side seam of just the front bodice at the armpit so that it pulled some of the excess taut.

And then the extra pooling under bust. There were fairly substantial underbust darts already, so I didn't want to increase their size (lest it get too pointy), and neither did I want to mess with the darts in the side seam. So I pinned a slightly shorter dart adjacent to each existing dart (placement closer to CF) and the excess under bust was much improved. To fit the slightly smaller underbust width of the bodice, I also had to tuck the waistband to fit.


After these adjustments were made, I didn't like the way the waistband was hanging (dipping down) so I tucked up the bodice at centre front so it sat more horizontally. I'm not sure if this is one change too much (or even two or three!)? Please tell me if you think so...

Spin doppelganger around and this is what's going on at the back:

Pure horror really, but actually not that hard to fix. I did the same half inch horizontal tuck across the width and it sits much better. Good thing I have puny pencil arms so I don't have to make the armholes bigger elsewhere.

So there you go then. An ambitious non-muslin that is now very much a muslin because it'll need to be completely re-cut and re-worked.

I have to say, I'm finding the process of sewing for myself very hard. If anything, it's actually hurting my body image. If I try something on in the shop and it doesn't fit, I don't buy it. But using my materials (therefore money) and my time to make something that doesn't fit is pretty soul destroying and it's making me dislike my pesky body shape even more. So, my sewing friends, does it get easier? If I keep calm and carry on will I start to know my body so well I can make adjustments before it even gets to muslin stage? Also, tales of how much it's worth it would be appreciated...

Friday, 21 May 2010

10

Don't let the jazz hands put you off

You might have noticed that I have lost my Cool Girl credentials in my own t-shirt sew along by not posting a final success. But before I bashed my head against the wall revising my pattern for my bust o' plenty I wanted to do some research on how exactly patterns adapt for a full bust. Now that I'm actually paying attention to adult clothes making, one book that has popped up over and over is Fit for Real People.


The cover is a homage to unflattering, untrendy clothes. And jazz hands. But I bought it anyway, and hand on heart it's one of the most fascinating books ever. Like page-turning fascinating.


Sure, the chapter on busts is super helpful but there is so much more I've learned. Like why store bought dresses and tunics never fit right. The combination of the extra distance fabric has to travel over my bust, plus a sway back, means that everything is always longer in the back than the front and garments that are thigh length or longer always cling to my bum despite it being not-very-curvy. Here's an example courtesy of my doppelganger:

before

If I was to rip the seam out above the waistband and straighten it out like so:

fix

It evens out the rest of the dress and fixes the unflattering bum clinginess:

check pinning

So now the front fit (which was mostly fine) is unchanged:

green dress front after

And the side view is 3000% more flattering:

green dress side after

The good news now I have this book? I might be able redress badly fitting store bought clothes. The bad news? I think every single pattern I've bought is too big because I based it on my full bust and not my high bust (which put me in plus size). The strange news? It blows my mind that we should be sewing the right and left side differently to compensate for asymmetry like uneven shoulders and hips. It totally makes sense, but is very strange stuff indeed. If Cool Girls are going to venture into the trouser or blouse patterns and have non-boyish bodies I think this book will help a million times over!

Friday, 19 February 2010

24

Your chance to join the Cool Girl's Club

I'm really excited about some proper big girl sewing books I received this week. But I'm the most excited about this one:


To date, I've only used one commercial pattern to make something for myself and I wasn't altogether happy with the results. I've been put off doing more commercial patterns because I'm a non-standard shape and full-bust adjustments scare the bejesus out of me. But with this book, you take twenty four body measurements, like so:

And with all your measurements, you can draft a pattern specifically for you. In principle it sounds very exciting. Quite technical, but I like technical.

There are fifteen designs included and I think I'm going to start with a skirt. Because not only are these skirts lovely (and they use less measurements) but I'm pretty sure I'm going to look as cute as this model. After I've had my legs broken, lengthened and re-set, dyed my grey hair away, lost six hundred pounds and had a breast reduction.

So anyway... I've been thinkng for a time about organising some sort of group activity through my blog. A swap is out because I can't think of a theme. But does anyone fancy a sew-along?