Showing posts with label tutorials. Show all posts
Showing posts with label tutorials. Show all posts
Sunday, 22 June 2014
15
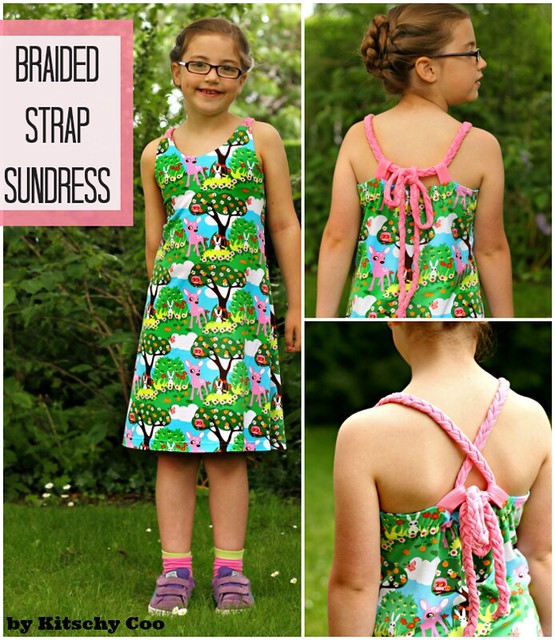
I'm up today as part of Melly Sew's 30 Days of Sundresses series with a super cute and versatile braided strap dress. This is my second year participating (last year's is here), make sure you check out the rest of the contributions on Melly's blog!
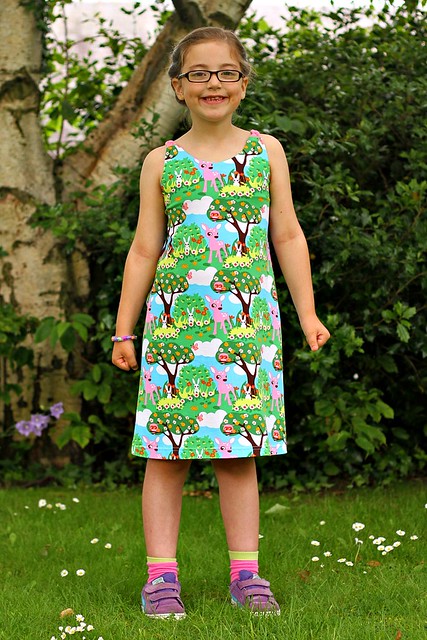
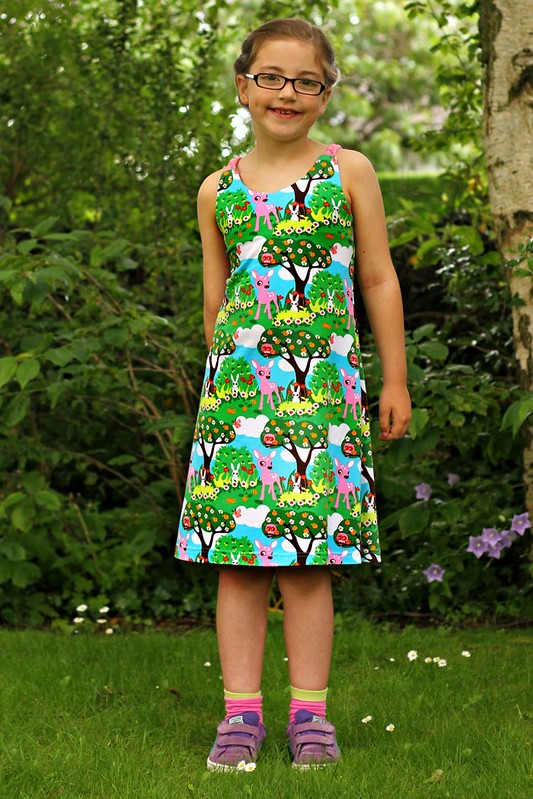
The sundress has a slight V-neck, a slim a-line shape, and two long braided straps. With various ways to tie the straps and the elasticated back I think Maia will be sporting this dress for several summers.
I'm offering the pattern download for this specific size for free HERE, it has finished garment measurements of 27" chest circumference, 29" shoulder to hem length and hits my sturdy and tall 7 year old just below the knee so I'd loosely deem it size 7 to 10 years old. If you're wanting a size different than that, it's not that difficult to draft a different size using a well fitting tank top as a starting point. This dress is made out of knits because I am me, but it should work for wovens too (although you should use a knit, ribbons, or something else that won't fray for the braids).
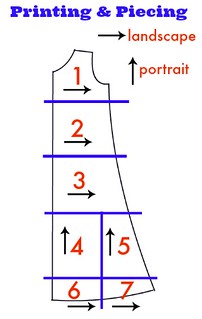
The royal blue lines are where you cut and piece to the adjacent pieces. I've nested the Front, Back, Front Facing, and Back Facing so you only have to print 6 pages.
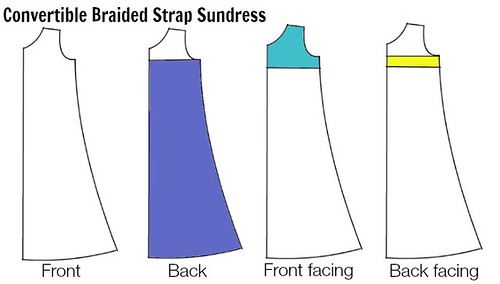
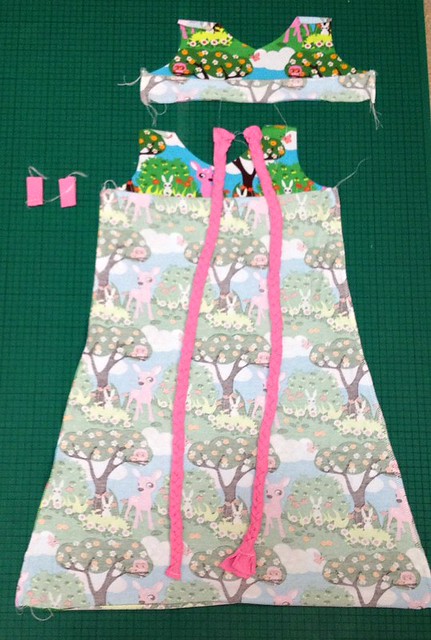
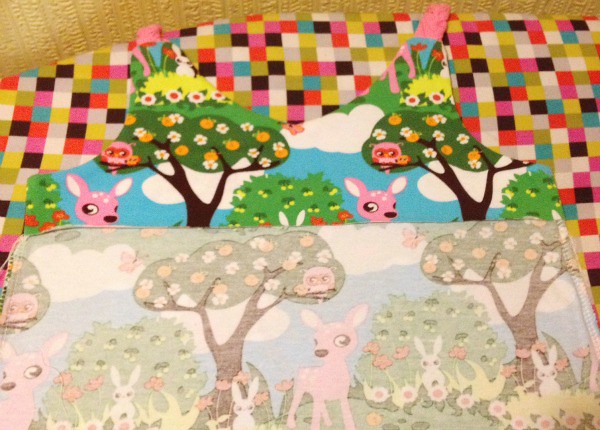
All of the cutting instructions are written on the pattern, but in case you can't visualise what I'm talking about regarding how the Back, Front Facing, and Back Facing relate to the Front piece, this diagram should help!
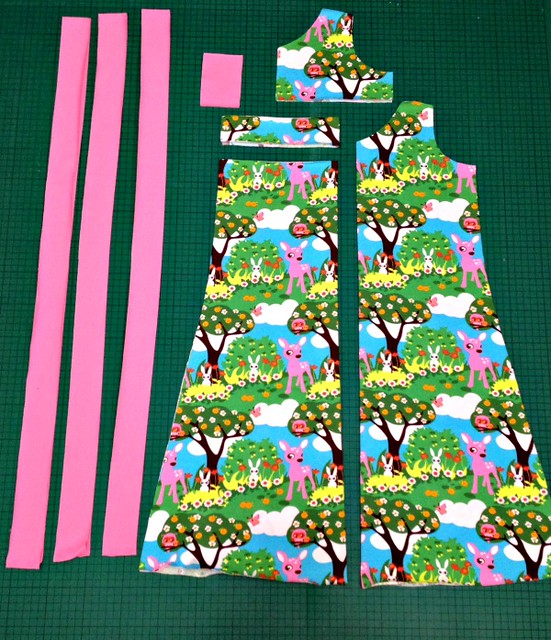
Cut your pieces: one front, one back, one front facing, one back facing, two tabs, and six strips for braiding.
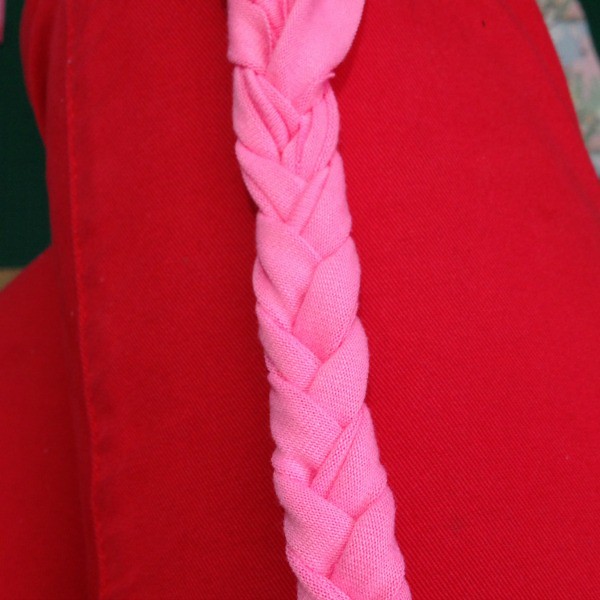
Sew or pin the ends of three braid strips together. Start braiding the strips. At the very beginning you should braid loosely so it's more-or-less flat; it'll be easier to attach to the dress if it's not tight and thick. Continue braiding until you get to the end.
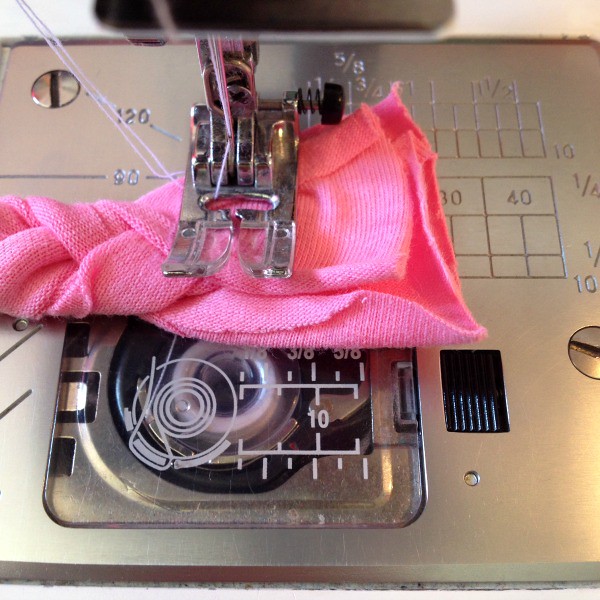
Secure the ends. Repeat for other braid.
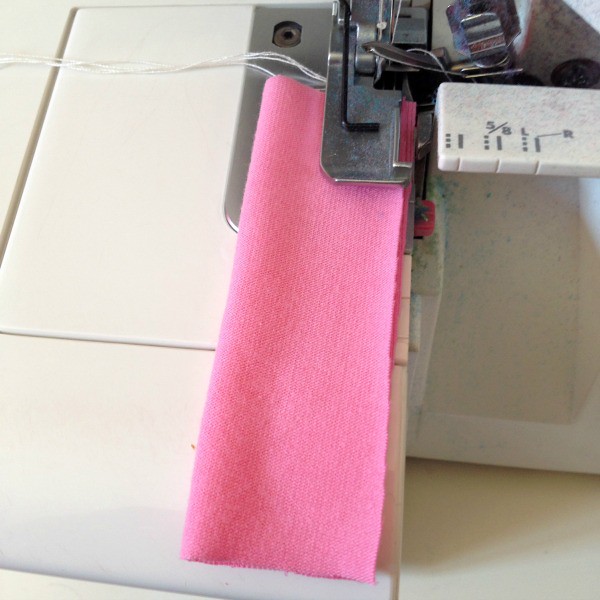
Right sides facing, fold a tab in half vertically and sew. Repeat for other tab. Turn tabs right side out and press well so the seam is in the centre.
Right sides facing, sew the side seams of the front piece to the back piece. Right sides facing, sew the side seams of the front facing to the back facing. Optional: finish the bottom edge of the facing. I didn't because I was using a knit. This is what you should have so far.
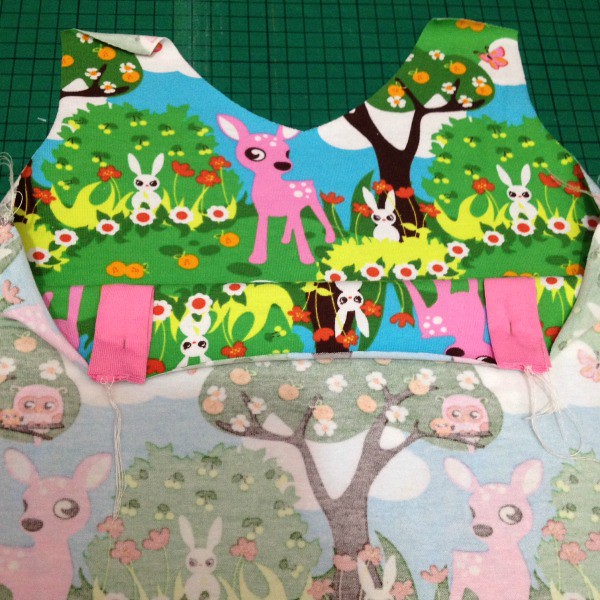
Fold a tab in half and pin in position on the back of the dress facing down. Baste in place within the seam allowance. Repeat for other tab.
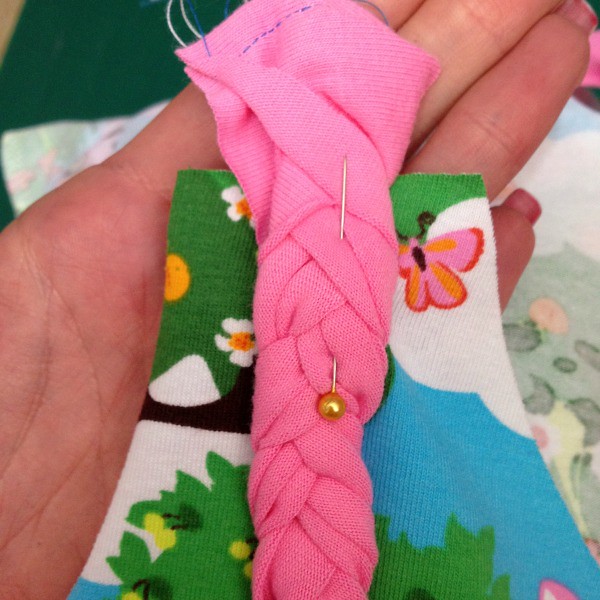
Pin the flat-ish end of a braid to the shoulder making sure it's in the centre and away from the seam allowances. I pull the strap up and over the top edge so I'd still be able to clearly see it after the facing is pinned on top. Baste in place. Repeat for other strap.
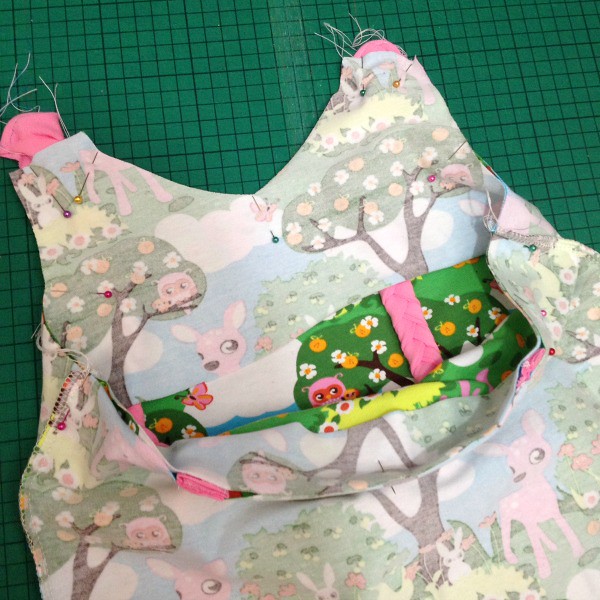
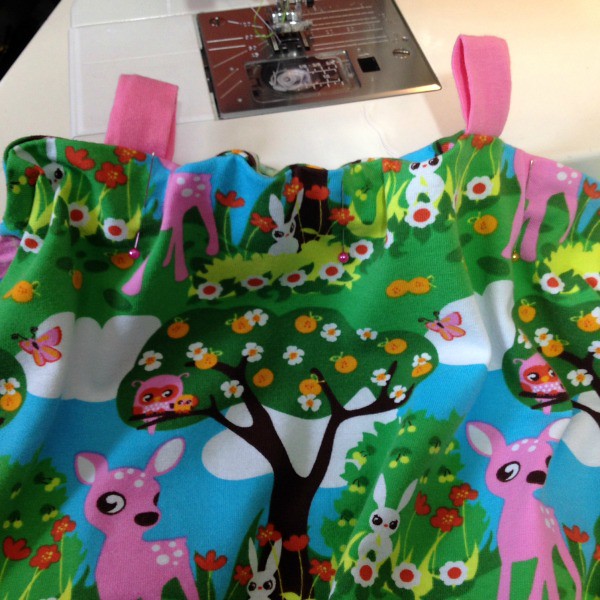
Right sides facing, slip the facing over the dress and match the raw edges all the way around. Pin regularly. This is how it will look.
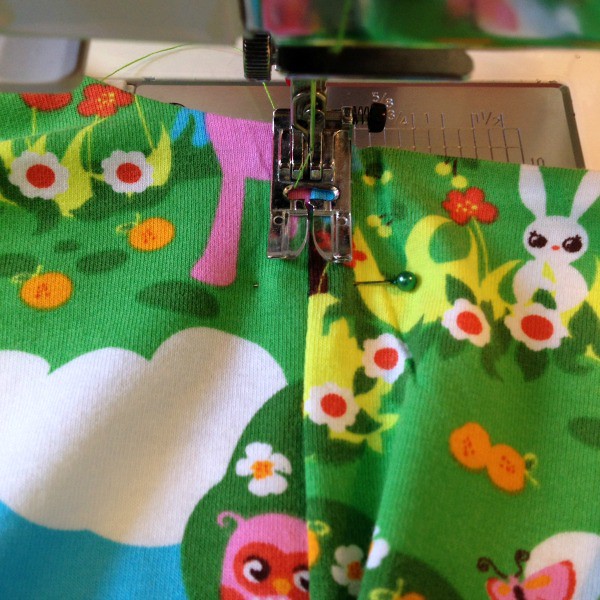
Starting at a side seam, start sewing across the back edge, over the side seam, and up around the arm curve. When you get to where the strap is, use your fingers to make sure you are not catching any bit of the braid in the stitch, and sew as close to the strap as you can. Pivot and sew the top edge of the strap, pivot and sew down towards the neckline, again using your fingers to make sure the strap isn't going to be caught. Pivot at the V and repeat the same process for the other side until you get back to where you started.
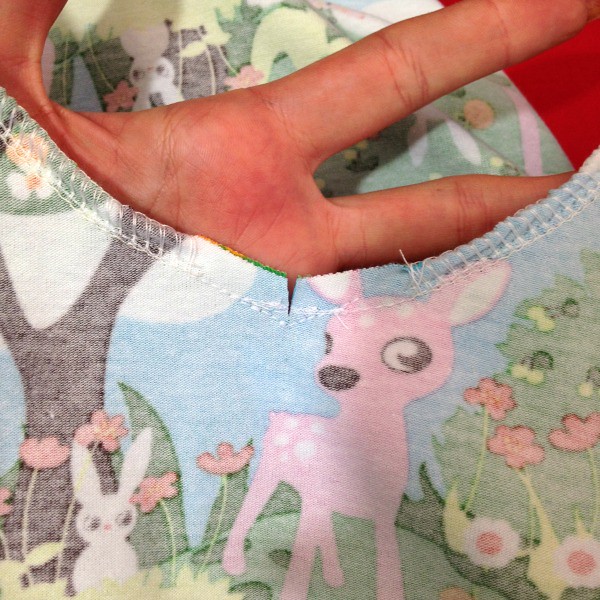
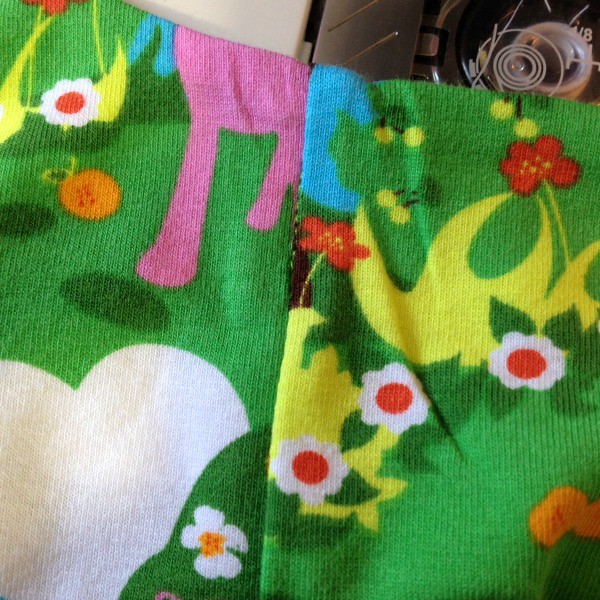
Clip a notch into the V but don't cut the threads! You can see that I added some stay-stitching within the seam allowance as well to give the V some extra stability.
Flip the facing towards the inside of the dress and press everything so that it lies flat. I roll the facing slightly towards the interior so it's invisible from the right side.
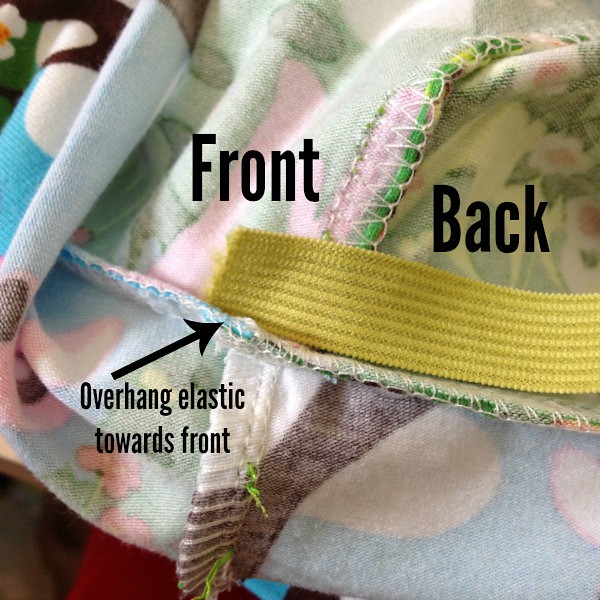
Cut a piece of elastic two inches shorter than the width of the back piece. Flip up the facing and pin one end of the elastic about 1/4" towards the front side of the side seam of the dress. Pin from the right side of the dress and not in-between in the wrong sides between the dress and facing or you could have trouble getting your pin out later!
Flip the facing back down and ensure that the two layers still match up on the side seam. From the right side of the dress, stitch in the ditch (on the side seam). This will catch the dress, the facing, and the elastic in between.
Repeat the process with the other end of the elastic in the opposite side seam. See how it's nearly invisible!
Stretch the back of the dress so the elastic and facing are sitting flat and pin the layers together. Make sure the facing is still sitting neatly underneath, and that the elastic is up near the top of the channel away from where the channel stitching might catch it. Starting at one side seam and heading across the back of the dress, sew the bottom edge of the facing to the dress, ending at the opposite side seam. You now have a casing for the elastic. Press and hem the bottom edge of the dress and you're done!
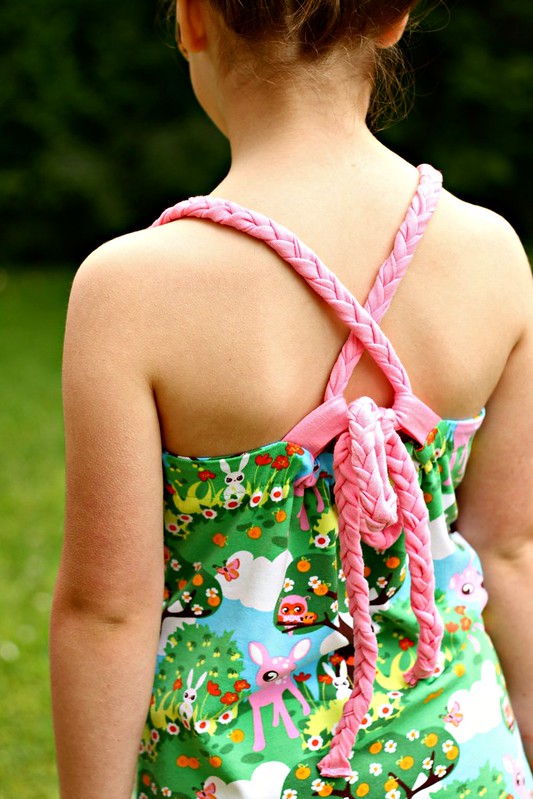
You can tie the braids crossover...
Or over the shoulder and through the tabs...
And probably a bunch of other ways as well.
Make sure you check out the rest of the Melly Sew's 30 Days of Sundresses series for great inspiration and free patterns and tutorials!
Tutorial: Convertible Braided Strap Sundress
I'm up today as part of Melly Sew's 30 Days of Sundresses series with a super cute and versatile braided strap dress. This is my second year participating (last year's is here), make sure you check out the rest of the contributions on Melly's blog!
The sundress has a slight V-neck, a slim a-line shape, and two long braided straps. With various ways to tie the straps and the elasticated back I think Maia will be sporting this dress for several summers.
I'm offering the pattern download for this specific size for free HERE, it has finished garment measurements of 27" chest circumference, 29" shoulder to hem length and hits my sturdy and tall 7 year old just below the knee so I'd loosely deem it size 7 to 10 years old. If you're wanting a size different than that, it's not that difficult to draft a different size using a well fitting tank top as a starting point. This dress is made out of knits because I am me, but it should work for wovens too (although you should use a knit, ribbons, or something else that won't fray for the braids).
The royal blue lines are where you cut and piece to the adjacent pieces. I've nested the Front, Back, Front Facing, and Back Facing so you only have to print 6 pages.
All of the cutting instructions are written on the pattern, but in case you can't visualise what I'm talking about regarding how the Back, Front Facing, and Back Facing relate to the Front piece, this diagram should help!
Cut your pieces: one front, one back, one front facing, one back facing, two tabs, and six strips for braiding.
Sew or pin the ends of three braid strips together. Start braiding the strips. At the very beginning you should braid loosely so it's more-or-less flat; it'll be easier to attach to the dress if it's not tight and thick. Continue braiding until you get to the end.
Secure the ends. Repeat for other braid.
Right sides facing, fold a tab in half vertically and sew. Repeat for other tab. Turn tabs right side out and press well so the seam is in the centre.
Right sides facing, sew the side seams of the front piece to the back piece. Right sides facing, sew the side seams of the front facing to the back facing. Optional: finish the bottom edge of the facing. I didn't because I was using a knit. This is what you should have so far.
Fold a tab in half and pin in position on the back of the dress facing down. Baste in place within the seam allowance. Repeat for other tab.
Pin the flat-ish end of a braid to the shoulder making sure it's in the centre and away from the seam allowances. I pull the strap up and over the top edge so I'd still be able to clearly see it after the facing is pinned on top. Baste in place. Repeat for other strap.
Right sides facing, slip the facing over the dress and match the raw edges all the way around. Pin regularly. This is how it will look.
Starting at a side seam, start sewing across the back edge, over the side seam, and up around the arm curve. When you get to where the strap is, use your fingers to make sure you are not catching any bit of the braid in the stitch, and sew as close to the strap as you can. Pivot and sew the top edge of the strap, pivot and sew down towards the neckline, again using your fingers to make sure the strap isn't going to be caught. Pivot at the V and repeat the same process for the other side until you get back to where you started.
Clip a notch into the V but don't cut the threads! You can see that I added some stay-stitching within the seam allowance as well to give the V some extra stability.
Flip the facing towards the inside of the dress and press everything so that it lies flat. I roll the facing slightly towards the interior so it's invisible from the right side.
Cut a piece of elastic two inches shorter than the width of the back piece. Flip up the facing and pin one end of the elastic about 1/4" towards the front side of the side seam of the dress. Pin from the right side of the dress and not in-between in the wrong sides between the dress and facing or you could have trouble getting your pin out later!
Flip the facing back down and ensure that the two layers still match up on the side seam. From the right side of the dress, stitch in the ditch (on the side seam). This will catch the dress, the facing, and the elastic in between.
Repeat the process with the other end of the elastic in the opposite side seam. See how it's nearly invisible!
Stretch the back of the dress so the elastic and facing are sitting flat and pin the layers together. Make sure the facing is still sitting neatly underneath, and that the elastic is up near the top of the channel away from where the channel stitching might catch it. Starting at one side seam and heading across the back of the dress, sew the bottom edge of the facing to the dress, ending at the opposite side seam. You now have a casing for the elastic. Press and hem the bottom edge of the dress and you're done!
You can tie the braids crossover...
Or over the shoulder and through the tabs...
And probably a bunch of other ways as well.
Make sure you check out the rest of the Melly Sew's 30 Days of Sundresses series for great inspiration and free patterns and tutorials!
Monday, 19 May 2014
5
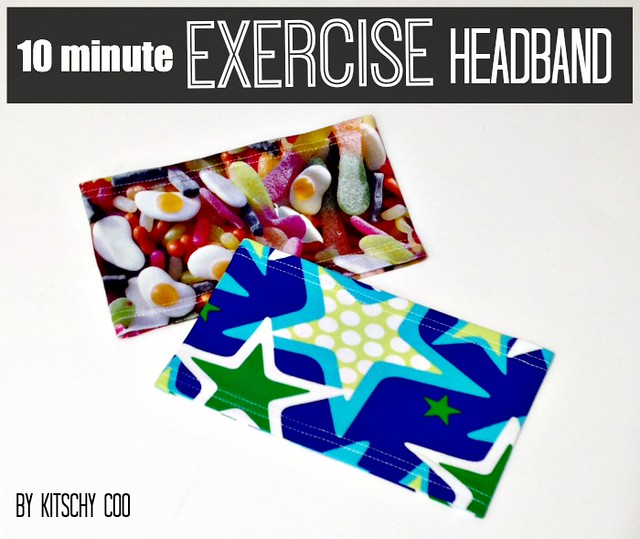
Since taking up running again, I've had to battle with how to keep my hair out of my face now that it's too short for a ponytail. Big, fat headbands are the solution! They're tall enough to keep all my hair from blowing forward into my face (and also cover my perennially cold ears), but thin enough to scrunch up under my hair at my neck without being bulky. Have a lot of knits scraps? Have unruly, pesky hair? Have ten minutes? Let's go!
Fabric requirements: You really need fabric with lycra in it so that it will not only stretch but recover enough to stay on your head firmly. Interlock and 100% cotton jersey are a nope.
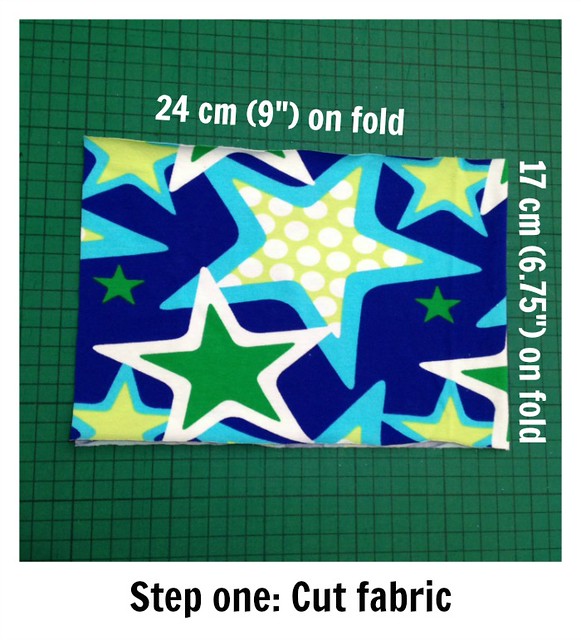
On the fold, cut your fabric so that it is 24cm wide (48cm unfolded) by 17cm tall.
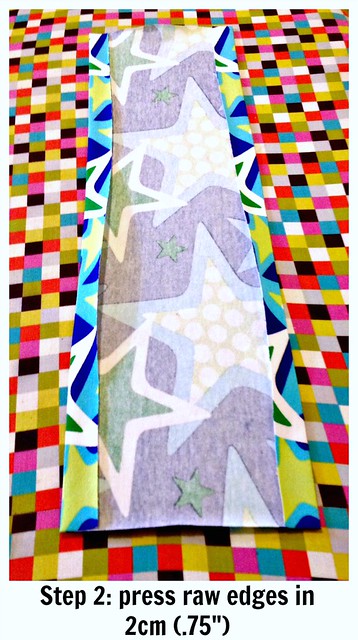
Press the raw edges towards the wrong side by 2cm.
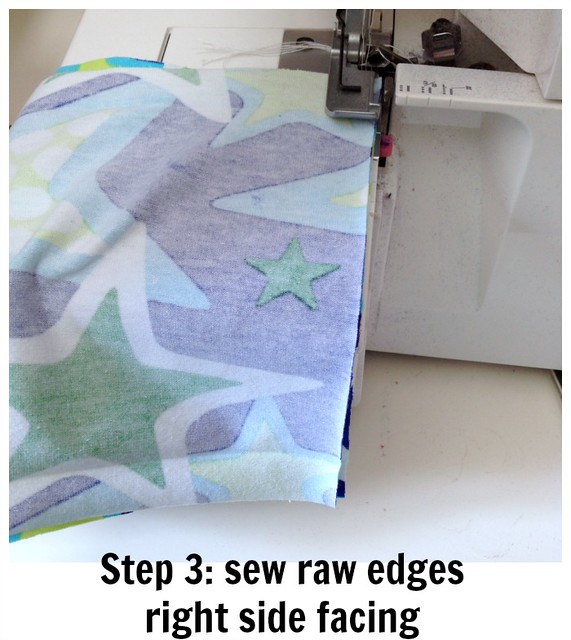
Right sides facing, sew the 17cm tall raw edges together.
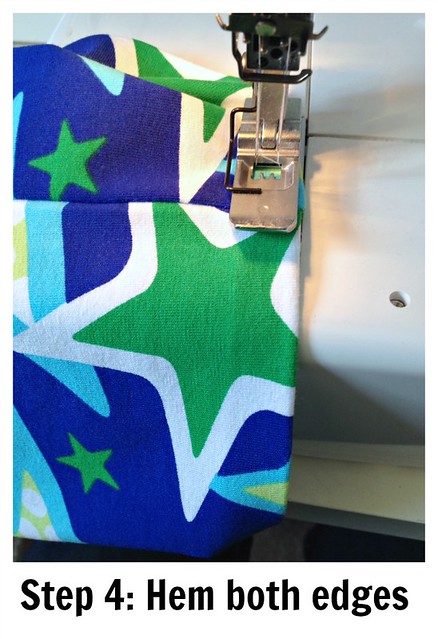
Hem the long edges that you previously pressed in step two. I'm using a coverstitch because I'm lucky enough to have one, but you can also use a twin needle in a regular machine, or any other stretch stitch that will stretch without breaking. That's it!
Optional but not recommended: Have a child steal it.
Tutorial: 10 Minute Exercise Headband
Since taking up running again, I've had to battle with how to keep my hair out of my face now that it's too short for a ponytail. Big, fat headbands are the solution! They're tall enough to keep all my hair from blowing forward into my face (and also cover my perennially cold ears), but thin enough to scrunch up under my hair at my neck without being bulky. Have a lot of knits scraps? Have unruly, pesky hair? Have ten minutes? Let's go!
Fabric requirements: You really need fabric with lycra in it so that it will not only stretch but recover enough to stay on your head firmly. Interlock and 100% cotton jersey are a nope.
On the fold, cut your fabric so that it is 24cm wide (48cm unfolded) by 17cm tall.
Press the raw edges towards the wrong side by 2cm.
Right sides facing, sew the 17cm tall raw edges together.
Hem the long edges that you previously pressed in step two. I'm using a coverstitch because I'm lucky enough to have one, but you can also use a twin needle in a regular machine, or any other stretch stitch that will stretch without breaking. That's it!
Optional but not recommended: Have a child steal it.
Friday, 20 December 2013
6
I'm bringing Scattered Thoughts of a Crafty Mom's Holiday Sewing Series to a close today with a super speedy tutorial:
I know, right? So easy I actually feel pretty guilty about posting it but but BUT I did some googling when I had the idea and surprisingly there wasn't anything too similar. The tree and stars are complete no-sew, but the baubles require a tiny bit of sewing (although you could omit the detail and just use the outline). You can download the templates for the three shapes here, but there are a tonne of Christmas clip art templates if you want to add more shapes... Reindeer? Stockings? Snowflakes? Candy canes? Leather ornament all the things!
Cut out your shapes and trace them on your leather. Using sharp scissors, carefully cut around the outlines. If you're going to sew the zigzag detail on the baubles, cut the zigzag from a second colour. Use a glue stick to position the zigzag on the bauble.
After the glue is dry, put a heavy duty needle in your machine (specific leather needles are best but general heavy duty needles are fine too). To stop the leather from waving / distorting, I use a slightly longer stitch length of 2.8. Start sewing close to the edge, stopping at the corners and with the needle in the down position, and pivoting to continue sewing around all the edges until you get back to where you started.
Use an awl or craft knife to make a hole at the top for hanging. If you have the hardware, grommets would be pretty nifty too.
I used leather cording with a simple knot at the top for hanging.
And that's it! They took me fourteen times longer to photograph than make and our tree looks (marginally) more classy so that's a result by all accounts.
Make sure that you check out the series for lots of Christmas sewing ideas, including yesterday's tutorial from Jamie herself with reversible holiday placemats. There will be a linky party on Scattered Thoughts of a Crafty Mom tomorrow for everyone to link up their recent holiday sewing, and there's a even a giveaway for a Brother 1034d serger closing tomorrow!
Holiday Sewing: Simple Leather Christmas Ornaments Tutorial
I'm bringing Scattered Thoughts of a Crafty Mom's Holiday Sewing Series to a close today with a super speedy tutorial:
I know, right? So easy I actually feel pretty guilty about posting it but but BUT I did some googling when I had the idea and surprisingly there wasn't anything too similar. The tree and stars are complete no-sew, but the baubles require a tiny bit of sewing (although you could omit the detail and just use the outline). You can download the templates for the three shapes here, but there are a tonne of Christmas clip art templates if you want to add more shapes... Reindeer? Stockings? Snowflakes? Candy canes? Leather ornament all the things!
Cut out your shapes and trace them on your leather. Using sharp scissors, carefully cut around the outlines. If you're going to sew the zigzag detail on the baubles, cut the zigzag from a second colour. Use a glue stick to position the zigzag on the bauble.
After the glue is dry, put a heavy duty needle in your machine (specific leather needles are best but general heavy duty needles are fine too). To stop the leather from waving / distorting, I use a slightly longer stitch length of 2.8. Start sewing close to the edge, stopping at the corners and with the needle in the down position, and pivoting to continue sewing around all the edges until you get back to where you started.
Use an awl or craft knife to make a hole at the top for hanging. If you have the hardware, grommets would be pretty nifty too.
I used leather cording with a simple knot at the top for hanging.
And that's it! They took me fourteen times longer to photograph than make and our tree looks (marginally) more classy so that's a result by all accounts.
Make sure that you check out the series for lots of Christmas sewing ideas, including yesterday's tutorial from Jamie herself with reversible holiday placemats. There will be a linky party on Scattered Thoughts of a Crafty Mom tomorrow for everyone to link up their recent holiday sewing, and there's a even a giveaway for a Brother 1034d serger closing tomorrow!
Labels:
leather craft,
sewing,
sharing the love,
tutorials
Sunday, 6 October 2013
3
As you know, my reversible zippy hoodie pattern is part of the Sew Fab bundle that's available for one week only (you only have til 8am EST on Tuesday morning to get yours!). A lot of people's reactions to the hoodie might be 'Ugh, too much time / effort' but I'm going to show you how to make the pattern non-reversible. I had no idea that making the zippy hoodie non-reversible would shave off quite much of the making time; the reversible version takes me between three and four hours, the non-reversible version took me a little bit more than an hour! As well as the time consideration, a non-reversible hoodie has half the fabric costs and a non-reversible zip will bring your material costs down too.
Omitting the lining will work best with medium to heavy weight fabrics, for this one I used a heavy-ish cotton lycra french terry. If you don't have a serger, you should zig-zag (or otherwise seam-finish) the raw edges for neatness as they'll be exposed without a lining. I recommend that you use a zipper than is the correct length already rather than shortening one as it'll save you a lot of time, and it's also much easier to find the correct length zipper when it's not a reversible one. Let's get started!
Cut one back, two fronts, two sleeves, two hoods from the main fabric, and one waistband and two arm cuffs from ribbing. Personally I like the neater appearance of a lined hood so I also cut two hood pieces from lining fabric. You'll also need a strip of 1" wide knit several inches longer than the neckline to bind the raw edge, I like interlock because it's stable and doesn't curl.
Assemble the hoodie as you would the reversible version: sew shoulder seams, sew sleeves, sew side seams. Sew the arm cuffs, fold, and then sew the cuffs to the sleeves. Fold the waistband and sew waistband to hoodie. You will have this:
Sew the two shell hoods along the centre seam. Sew the two lining hoods along the centre seam. Turn lining right side out, place lining hood inside shell hood (right sides facing) and sew together along the face line. Flip right side out through the open neckline. Press. Baste opening shut along the neckline edge. Set hood aside, unlike the reversible hoodie we're going to do the zipper first.
If you're using a knit you will want to iron a strip of interfacing along both centre front edges on the wrong side of the fabric. This will make it easier to sew your zipper in without waving. The interfacing should go from the top all the way down onto the bottom of the ribbing. Do this to both front pieces.
Unzip the zipper so you have two separate sides. With the zipper right side down and the teeth facing towards the side seams, align the edge of the zipper tape with the centre front edge of the hoodie. If you're using the correct length of zipper it should reach down to the bottom of the ribbing with the extra bit of tape sticking up at the top edge. Baste the zipper tape to the hoodie close to the edge. Repeat for the other side, making sure that your zipper is positioned exactly the same on the left and right sides so they're even when you zip it up.
When both sides have been basted, fold the zipper towards the inside of the hoodie so the teeth are sticking out. The fold of the fabric should not be too close to the teeth or you run the risk of the fabric catching in the zip. Press well with the iron.
Topstitch close to the edge of the fold, securing the zipper tape in the correct position. Take care when sewing through the waistband seam and ribbing as it's quite a bit thicker. Repeat for the other side. This is what it will look like now:
If there is any extra tape sticking up at the top, trim it off. This is a case of do as I say, not as I do. I folded the tape under so it was trapped under the tape which is good thing to do if you're not finishing the neckline seam, but unnecessarily bulky if you are!
Pin the hood to the neckline, stretching it slightly (or easing if you're using a woven) it so that the edge of the hood is very close to the zipper tape.
Baste in place close to the edge.
Then get your strip of knit (remember it should be longer than the neckline by a couple of inches!) and pin it along the neckline edge so that the raw edges match at top. Start from the centre and work towards the zipper.
When you get to the zipper, fold the strip back towards the middle and pin in place. Repeat for the other side.
Stitch through all layers, attaching the hood to the neckline.
Press the seam allowance down firmly towards the hoodie.
Then press the trim down so the seam is hidden.
And then fold up the bottom raw edge of the trim so it is enclosed and neat. The corners are also neat (albeit a little bit bulky as I didn't trim off the zipper tape).
Press and steam until your arms can't take it anymore.
With the trim facing up, carefully topstitch along the bottom edge of the trim.
If you want you can also pivot and stitch up along the folded edge of the trim. Admire your nice neat neckline.
You're done!
Tutorial: Make your Reversible Zippy Hoodie Non-Reversible (plus a really neat bound neckline finish)
As you know, my reversible zippy hoodie pattern is part of the Sew Fab bundle that's available for one week only (you only have til 8am EST on Tuesday morning to get yours!). A lot of people's reactions to the hoodie might be 'Ugh, too much time / effort' but I'm going to show you how to make the pattern non-reversible. I had no idea that making the zippy hoodie non-reversible would shave off quite much of the making time; the reversible version takes me between three and four hours, the non-reversible version took me a little bit more than an hour! As well as the time consideration, a non-reversible hoodie has half the fabric costs and a non-reversible zip will bring your material costs down too.
Omitting the lining will work best with medium to heavy weight fabrics, for this one I used a heavy-ish cotton lycra french terry. If you don't have a serger, you should zig-zag (or otherwise seam-finish) the raw edges for neatness as they'll be exposed without a lining. I recommend that you use a zipper than is the correct length already rather than shortening one as it'll save you a lot of time, and it's also much easier to find the correct length zipper when it's not a reversible one. Let's get started!
Cut one back, two fronts, two sleeves, two hoods from the main fabric, and one waistband and two arm cuffs from ribbing. Personally I like the neater appearance of a lined hood so I also cut two hood pieces from lining fabric. You'll also need a strip of 1" wide knit several inches longer than the neckline to bind the raw edge, I like interlock because it's stable and doesn't curl.
Assemble the hoodie as you would the reversible version: sew shoulder seams, sew sleeves, sew side seams. Sew the arm cuffs, fold, and then sew the cuffs to the sleeves. Fold the waistband and sew waistband to hoodie. You will have this:
Sew the two shell hoods along the centre seam. Sew the two lining hoods along the centre seam. Turn lining right side out, place lining hood inside shell hood (right sides facing) and sew together along the face line. Flip right side out through the open neckline. Press. Baste opening shut along the neckline edge. Set hood aside, unlike the reversible hoodie we're going to do the zipper first.
If you're using a knit you will want to iron a strip of interfacing along both centre front edges on the wrong side of the fabric. This will make it easier to sew your zipper in without waving. The interfacing should go from the top all the way down onto the bottom of the ribbing. Do this to both front pieces.
Unzip the zipper so you have two separate sides. With the zipper right side down and the teeth facing towards the side seams, align the edge of the zipper tape with the centre front edge of the hoodie. If you're using the correct length of zipper it should reach down to the bottom of the ribbing with the extra bit of tape sticking up at the top edge. Baste the zipper tape to the hoodie close to the edge. Repeat for the other side, making sure that your zipper is positioned exactly the same on the left and right sides so they're even when you zip it up.
When both sides have been basted, fold the zipper towards the inside of the hoodie so the teeth are sticking out. The fold of the fabric should not be too close to the teeth or you run the risk of the fabric catching in the zip. Press well with the iron.
Topstitch close to the edge of the fold, securing the zipper tape in the correct position. Take care when sewing through the waistband seam and ribbing as it's quite a bit thicker. Repeat for the other side. This is what it will look like now:
If there is any extra tape sticking up at the top, trim it off. This is a case of do as I say, not as I do. I folded the tape under so it was trapped under the tape which is good thing to do if you're not finishing the neckline seam, but unnecessarily bulky if you are!
Pin the hood to the neckline, stretching it slightly (or easing if you're using a woven) it so that the edge of the hood is very close to the zipper tape.
Baste in place close to the edge.
Then get your strip of knit (remember it should be longer than the neckline by a couple of inches!) and pin it along the neckline edge so that the raw edges match at top. Start from the centre and work towards the zipper.
When you get to the zipper, fold the strip back towards the middle and pin in place. Repeat for the other side.
Stitch through all layers, attaching the hood to the neckline.
Press the seam allowance down firmly towards the hoodie.
Then press the trim down so the seam is hidden.
And then fold up the bottom raw edge of the trim so it is enclosed and neat. The corners are also neat (albeit a little bit bulky as I didn't trim off the zipper tape).
Press and steam until your arms can't take it anymore.
With the trim facing up, carefully topstitch along the bottom edge of the trim.
If you want you can also pivot and stitch up along the folded edge of the trim. Admire your nice neat neckline.
You're done!
-----------------------------------------------------------------------------------------------------------
The reversible zippy hoodie is part of the Sew Fab bundle
in both sizes together for one week only. As a designer, I get a
portion of the sales made through my site so I really appreciate your
support! You can get your hands on it here:
Subscribe to:
Posts (Atom)


