Thursday, 10 November 2011

2

Send my prize this way

Despite my incessant whinging and pleading for an oven for approximately two years now, The Fairy Hobmother and I are still friends. Ish. Remember that old Chinese proverb, 'If friend does not have functional oven, other friend who sells ovens provides for her'? That one is under-appreciated. Anyway, he gave me the heads up that they are having a Christmas card competition through their facebook page where you design a card for them and they give me an oven or appliance of your choice. Never one to pass a competition up (except for most other competitions), I set my photoshopping skillz to the test. My original idea was to create a card that said, 'AppliancesOnline, giving bloggers other than Kitschy Coo ovens for (insert: time frame)' but:
  1. I couldn't find how long they'd been in business and therefore giving ovens to other people for. 'Years' was too vague. 'Ages' is a better use of the vernacular but still lacking specificity. Personally, I liked 'far too long' and thought it most accurately reflected the situation but it sounds a bit menacing.
  2. In general, this card lacked universal appeal. Personal appeal, not lacking. Universal appeal, perhaps.
  3. Not Christmassy.
So it was back to the drawing board. How could I combine a 'Happy Christmas' message with my agenda to score an new oven? Here's how:


If you have not watched Mad Men and are not therefore an advertising expert like me, just look at this subtle design. Universal appeal? Check. Everyone looking at this card will be heart-warmed by the combination of Santa, nice people, and appliance wish fulfilment. Clear message? Check. People need appliances and appliancesonline makes it happen. Let me repeat: People need appliances and appliancesonline makes it happen. *cough cough cough*

Disclaimer: The Fairy Hobmother compensated me for my time in posting this. But not with a oven, because this is a cruel world. The competition to design a card / win an appliance is on this page and submissions close tomorrow. If you do submit a card, please don't make it better than mine unless you are planning to send me your prize.

Wednesday, 9 November 2011

0

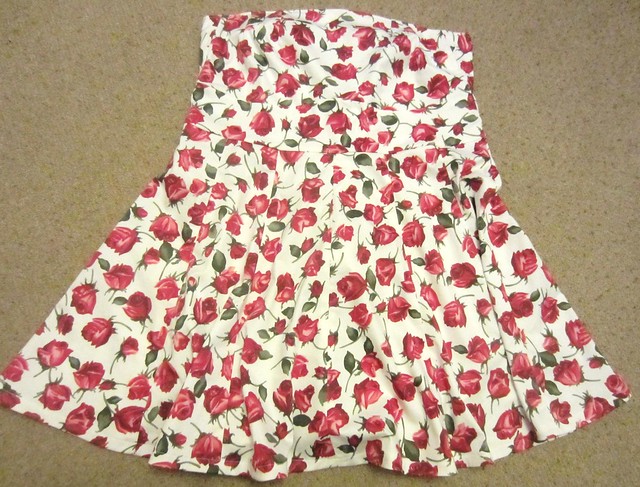
The Catriona Dress (part deux)

Remember this one, the dress I made for Maia's nursery nurse for her brother's wedding?


The wedding was down in Liverpool, with a bit of a Beatles theme and it sounded like it would be heaps of fun. I was on tenterhooks for the weekend (and the intervening October break), hoping she enjoyed her bespoke dress. However, upon our return to nursery, I heard that disaster had struck. And by disaster I mean the curse of working with small children: the dreaded norovirus. Shouldn't we write an opera about this and sing it in Italian? It's so sad.

Tuesday, 8 November 2011

11

The Posh Sleeve

posh kindle cover stitching

It was Steven's birthday yesterday and I was determined that this year I would make him something he'd actually utilise. This is harder than it sounds as (in the nicest possible way) he is picky and likes to play it safe. No statement pieces for him, unless the statement is, 'I bought this in a mainstream shop that is probably upscale'.

posh kindle cover

So out came the leather stash. I took a bit of a gamble in using this gorgeous turquoise blue, and an even bigger gamble with lime green contrast stitching. The tab is pinched and pulled through the strap so it stays closed and secure. He opened this present first with a semi-bemused but grateful thank you, until the second present revealed its intent...

posh kindle cover open

I will need to coax it out of him gradually and sneakily as to whether he wants me to make another cover in a more subdued brown leather. Thankfully, there's another Kindle user in this house who wouldn't mind the turquoise one bit.

Leather cases, yay or nay?

Thursday, 3 November 2011

4

Baby's gone geeky and a tiny reveal

geek hoody detail

Although this fabric has covered manifold gadgets, I'd never used it for a hoodie. I rectified this injustice today, with a small hoodie for a mystery recipient.

geek hoody front

I just love this fabric, it reminds me of the Pacman arcade machines that could be found in pizza shops of my childhood.

geek hoody reverse

For the reverse, I used a very soft turquoise twill from my stash. And an appliqued patch to tie it all together.

geek hoody reverse detail

With 24% trepidation and 76% excitement, I'm delighted to announce this hoodie is the first kit listed in my shop. I only have enough turquoise twill for one, though, so if you want to make this exact combination get in there quick. I will, however, be relisting it with alternative reverse fabrics in due course.

Seeing as you might be hopping over to my main site any how, check out my website revamp! My web guru and I have been diligently toiling away to completely change it up and over the next couple of weeks it's going to be filling up with all manner of things.... Remember how I've been talking about Top Secret News for the last forever? Can you find it?

Tuesday, 1 November 2011

24

Tutorial: Sewing an eye patch for lazy eye / strabismus / amblyopia

Now that we are (hopefully!) reaching the end of our patching regime in five short weeks, I thought I'd share the tutorial for making our eye patches. With the rate that we lose them, I'll probably still make half a dozen more though...

patch side

Some details about the patches: They consist of three layers (snazzy outer fabric, mid to heavyweight inner fabric, and soft flannel lining). The snazzy layer is self-explanatory, the inner layer is to give the patch some rigidity and also block out light, and the flannel (I've always used black) is so there's something nice and soft on her face. These patches are designed to fit my daughter's plastic moulded frames, which don't have nose guards. The patch is hooked onto the glasses with elastic, and then is essentially held on to her face by the glasses. Make sure the glasses are well fitting, as if they slip down the nose, the patch goes with it. No peeking is the general rule when it comes to patching. There are darts so a dome is created around the eye, meaning the vision is removed but the eye can still blink normally. The patch also extends well on to the leg of the glasses. No peeking, and no giving me the side- eye. We all win.

One feature of this patch that is optional is the bias binding. If you're just going to test the suitability of this type of patch, I'd do it initially with just a serged / rolled / overcast zigzag edge. Although the binding does give it a bit of stability and shape, it also adds a PITA factor of at least ten. Twenty if you use satin like me. The reason why I started binding the edges was because Maia complained that the stitching was scratchy. However... every time she complained about having to patch because of something specific, I changed it to accommodate her. Not because I am the best mum ever, but because she was going to wear that patch and there is not a complaint in the world that I will not thwart so be quiet and put your patch on.

A caveat: I am not an optometrist, nor do I play one on TV. I have, however, shown these patches to our specialist who thought they were better than the cloth patches that the NHS endorse. They're bigger and firmer so there is less chance of peeking. And they've definitely worked for us, with a far better improvement in her lazy eye than they were expecting.

Now that you can't sue me for this specific reason, let's go.

Materials: small piece snazzy fabric, small piece mid/heavy weight fabric (I use canvas), small piece soft lining (I use flannel, and always use black), 1/4" elastic, double fold binding (I use satin because I'm a masochist, and because my daughter is a special snowflake)

1 pattern

Here is the pattern. One of these days I'm going to figure out how to have a download-able pdf (anyone? anyone?) here. Please note that this is a patch for her left eye, if you need the right flip it for a mirror image. It is symmetrical along the horizontal fold line.

2 layers

Start making a fabric sandwich. Black flannel at bottom, canvas next...

3 cut

Fashion fabric on the top. I like cutting all of the layers together because I want them all the exact same size and shape. You will note that I also cut out the darts from the paper pattern. This is a special step for pedants who want to make sure the darts don't mess up the detail of the fabric.

4 post cut

Lovely fabric sandwich, non-obtrusive dart placement.

5 baste

Baste all three layers together close to the edge.

7 chalk

Flip it over and draw your dart lines with chalk on the lining.

6 elastic

Pin your elastic vertically 3/4" away from each end. Baste the ends in place at your previous basting line. **If you have glasses with nose prongs, omit the elastic at the inner side and make a centred 1" buttonhole there instead. You will slip the nose prong through the buttonhole to secure the patch to the glasses. The 1" size means that the patch can still be positioned easily up or down the face to ensure full coverage.

8 darts

Fold your dart in half so the legs match up and stitch. Repeat for other dart.

9 stitch down

Fold the dart to the outside (i.e. towards the leg end), and stitch it down along the basting line. Repeat for other dart.

10 dome

Now you have a dome. Readers without special snowflakes, you can actually serge / roll hem / overcast zigzag the whole thing now and omit the hateful binding.

11 iron

Fold and press your binding so the bottom portion is slighty wider than your upper portion.

12 pin

Starting at the elastic, pin your binding all the way around. Make sure that you are catching the fold underneath too. Pulling a bit on the binding will help you round the curves.

13 edge

When you get back to where you started, fold the raw edge to the inside and then pin over the raw edge underneath.

14 stitch

Start sewing just before the elastic (i.e. before the end bit that is folded over), going very slowly right at the edge of the binding on top. Remove the pins as you get close, smoosh down the darts so it's flat, leave the needle in the down position so you can pivot around the corners.

15 slipstitch

Because I hate satin bias binding, and cannot for the life of me stitch it neatly at the fold, I stop just before the folded end and slip stitch the layers together. And then you're done.

16 underneath

This is the (slightly wonky) inside. In my defense: satin bias binding. And shoulder bumps from my ingrate beloved daughter as I was trying to sew.

17 top

And the outside.

patch front

This is the proper way to wear the patch. The inner edge should sit on the bridge of her nose, rather than in the eye socket. The upper dart should be above the eyebrow and the lower dart on the cheek. Once those three are in position, pull the leg towards the ear to mould it to the face.

not effective

This is the improper way to wear the patch.

Monday, 31 October 2011

4

The Viking Raid

Full length 2

Seeing as I started with a Viking Hat for The Train to Crazy's Handmade Dress Up Series, I thought I'd finish with two full blown Viking costumes for Halloween.

headshot

We had two parties over the weekend, a nursery party this morning, and we're out guising tonight so at least they're getting heaps of wear for the million hours I spent on them. I've taken more than two hundred pictures so far and haven't been able to catch a single full length picture where they are both in focus and looking normal.

Full length 1

A brown jersey tunic for the boy, a red velveteen tunic for the girl, four faux fur legwarmers, four faux fur arm warmers, two faux fur capelets, ten faux suede ties, and two padded and stuffed hats. By my calculations, that's about ten different hateful fabrics. And I have a (probably fatal) lung condition from all the faux fur I inhaled.

slightly dopey

The Nordic talismans on the capelets were purchased from a shaman on Ebay. No joke.

like a boss

See how they strut the streets of Edinburgh like a boss. But wait... isn't something missing?

viking vampire

My screwed up Freudian Viking Projection Fantasy is complete.

Friday, 28 October 2011

8

Kit and Caboodle

cowboy hoodie 008

I was in a bit of a bind last week when I was asked to make a hoodie with very short notice. Luckily, I have bags upon bags of projects that have been cut but not sewn from the era when I did craft fairs and worked sweat-shop style to a schedule. It didn't save me heaps of time, but probably an hour of cutting and two hours of faffing about staring at fabric wondering what to make.

cowboy hoodie 009

I've been wondering for a while if I should be branching into kits as well as patterns. Kits are a great introduction to a project, and remove some of the stress and cost of picking components yourself. For a hoodie, you might buy your pattern from me, your fabric from another place, your ribbing from another, your zipper from another... all that shipping adds up! The fabric, pattern and notions would be included, and obviously you can use the pattern again and again.

cowboy hoodie 010

I have to admit, I don't have a lot of experience with sewing kits. I bought a few Clothkits a couple of years back but shamefully never made them up; I just really liked the fabric. Because their pattern pieces are actually printed on the fabric itself, I think it's slightly limiting if your child has a figure quirk like long arms or big bum. So I think I'd definitely be providing the fabric required as an even piece, but not pre-marked or cut.

What say you, hive mind... Do you like kits? Would you be interested in them as an introduction to a pattern? What things appeal or put you off?